|
What keeps you from improving? Is it lack of formal education or training? Lack of resources or opportunities in your area? Is it just not knowing what to do next? Consider asking someone to mentor you. Be specific in your request with what you hope to accomplish and a time frame. You may be surprised how many possible mentors would say yes. I recently became aware of my need for a mentor. September 20, 2019 I participated in the Vegas Dance Explosion Choreography Competition. I've been line dancing weekly for about 3 years now and really enjoying myself. I had a song stuck in my head and just needed to choreograph something to it. I went to enter the dance into the VDE competition, but the division for that dance was full! Ugh. I wanted to see how the dance would do. It's one thing for friends to like your dance, but would strangers? I had a little over a week to create a new dance and I was stuck because I had poured out my heart and soul into this dance. In college, I had a professor, who would say creating art is 1% inspiration and 99% perspiration. I would get so mad at him because he didn't seem to understand I couldn't do the 99% without the 1%! You can create good conditions for the 1%, but you can't force it. Also, 99% work that has 0% inspiration is just....uninspired! Fortunately, my husband had the 1% inspiration and came up with a great contra line dance idea. He also had a beginning and an end, I just had to come up with a middle and just like that we had a dance to submit for the competition. You should know that I'm not really competitive. I don't like competition. It doesn't thrill me, it rather terrifies me because I put way too much pressure on myself. I try to relax and tell myself it doesn't matter but my body seems to have a mind of its own. So why compete? At some point, I need feedback on how I'm doing and where I can improve, so I have to put myself out there. I survived the competition on 4 hours of sleep and a headache. I was a little disappointed in how everything went, but mostly, relieved that it was over and I somehow made it through. I came in third place with our dance. I think third was the best I could do on my own. I don't have a local person who is better trained in line dance than I am. The locals couldn't tell me how to set the level of the dance or properly write up the choreography. I had to teach myself. After receiving my competition results from the judges I shared my frustrations with the choreography competition coordinator. I told her that based on the judges scores I know I've done things wrong, but I don't know what I did wrong or how to improve. I don't have anyone to help me fix my mistakes. She was so kind to listen to my dilemma and then she offered to mentor me. She explained that's how she won the competition once upon a time, she had a mentor who helped her. I'm so glad she offered because I wouldn't even have thought to ask? The mentoring will have to be done via Skype because she lives in the bay area and I'm in L.A., but I'm so glad to have a way forward in improving my skills as a well rounded line dance instructor. Is there something you want to improve in your life? Some skill you'd like to take to the next level? My 1% inspiration for you is this: "Seek out a mentor." Now the 99% work is up to you. Good Luck!
Here is the third place dance to "A Nightmare on My Street" by DJ Jazzy Jeff and the Fresh Prince. Enjoy it at your Halloween party this year. Find the video teach here: A Nightmare on my Street
0 Comments
Saturday, July 20th at Christian Assembly Church in Los Angeles I taught for their Country Western Night. The dances were:
Boots Do Boogie, Choreographed by Erin Hoxie to Boot Scootin' Boogie by Brooks & Dunn and Friday Night by Eric Paslay Claire's Dance, Choreographed by Dianne Evans to Achy Breaky Heart by Billy Ray Cyrus and I Want Crazy by Hunter Hayes A Little Sweet, Choreographed by Dan Albro to Roller Coaster by Luke Bryan Electric Slide to Man I Feel Like a Woman by Shania Twain and Suds in the Bucket by Sara Evans Friday July 12th at the Elk's Lodge in Pasadena, CA I taught the dances:
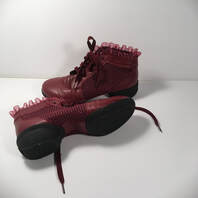
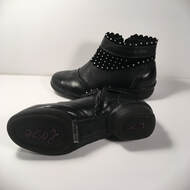
A Little Sweet, Choreographed by Dan Albro to the song Sugar by Maroon 5 Power Jam (San Diego Version), Choreographer unknown to the song Don't Stop 'Til You Get Enough by Michael Jackson Pitbull, Choreographed by Micaela Svensson Erlandsson to Echa Pa'lla by Pitbull We also danced that night: The Electric Slide to Elvira and New York, New York to the song of the same name. 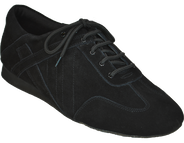 A good pair of dance shoes will prevent injury and reduce joint pain but you don't have to spend a lot of money for a shoe that will dance well. Read on to learn from my experiences with synthetic soles, sandals, leather boots, dance sliders, split soled shoes, and more. The quick answer to what makes a good dance shoe is good support and a leather sole. Leather is long wearing and allows for beautiful turning without wrenching your knees. If you have a pair of leather soled shoes in your closet shine them up and start there. Start with what you already have so you can figure out what you like and dislike about dancing in that kind of shoe. I've seen dancers in everything from flip flops to work boots and instructors wearing everything from Tom's to high heel dance sport shoes. All I can say is, "Just because you can, doesn't mean you should." I have gone through many shoes in an attempt to live blister free and avoid joint pain while dancing for hours on end. Pro Tip: To avoid blisters, I now baby powder my feet before I put on moisture wicking, seamless toe socks that I slip into shoes that are well ventilated. Works Wonders! 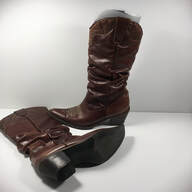 When I first became serious about line dancing I wore my super cute cowboy boots that had a synthetic sole and moved well on the dance floor. I loved these boots . . . until I started dancing in them. I had to buy a gel insert for the ball of my foot because there just wasn't enough padding there. The good news, I didn't blister. The bad news is it just doesn't feel great dancing in these shoes for more than one hour. I still wear them when I want to look cute and will only be dancing for 90 minutes. Verdict: Okay Update: The synthetic sole moves well for me on the dance floor, I have attempted to insert cushion for ball of foot and heel, really I can dance no more than 90 minutes in these. (10/15/2022) 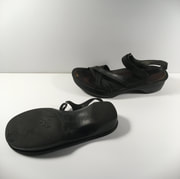 One week during the summer, when it was very hot, I tried dancing in my orthopedic, leather sandals. While my feet didn't sweat, or blister, I totally stretched out my sandals because of all the side to side and forward and back motion. Verdict: Don't ruin a good pair of shoes with the wrong activity. Update: I have since learned that dancers with bunions or bone spurs like to dance in sandals. (10/15/2022) 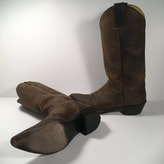 I decided to invest in a nice pair of leather boots from Boot Barn before going to Montana's Country Night Club. While these boots move well on the dance floor they also rub one of my ankle bones to the point of bruising. The seam on these boots buckles in toward my ankle and it is painful. My body literally will not let me put these on again because it remembers the pain. Verdict: You cannot enjoy dancing in shoes that pain you. Shoes may feel fine dancing in the store but will rub you raw after a half hour of dancing. You can't know until you try. Follow up: Because these are leather, I stuffed them with newspaper to try to pop out the part that rubs my ankle. I can now wear them, but I don't dance in them because doing stomps in boots can cause shin splints-no thank you. (1/13/2020) Update: I have given these boots to a friend because the last time I wore them I got a blister on my ankle bone. I have literally tried on every boot in my size at Boot Barn and French's Boots and cannot find a boot that doesn't rub. I need soft sided boots to come back in fashion because I can't get the stiff leather to work for me --even though they are so stylish.(10/15/2022) 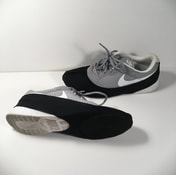 At a week long dance event my feet were blistered and in pain. At a certain point, I just couldn't put my feet in anything but tennis shoes or sandals. Desperate to get back on the dance floor, I bought a pair of dance sliders that slip over my tennis shoes. I was able to dance the rest of the time in my sliders and tennis shoes, but I must warn you that the felt on the bottom is extremely slippery on a well polished wooden floor. I learned that a friend seriously injured herself because she slipped and fell in her dance sliders and ended up having knee surgery. At my local recreational center the seniors use The DanceSocks, or cut socks to slip over the front of their tennis shoes or slide wrist sweat bands over their shoes to rest under the ball of their foot for turning. I've never seen them fall, but I've never tried it myself. Verdict: Use dance sliders and DIY hacks at your own risk. Update: When I know I will be dancing for 4.5 hours at the Cotton Eyed Joe I wear sketchers tennis shoes with DanceSocks over them. Feels like heaven, doesn't look as cute as I would like. I'm currently experimenting with some generic dance socks. Will report back. (10/15/2022)
I wanted a pair of split soled shoes like I saw so many people wearing at line dance class so I went online and bought two pair for a great price. These shoes did not dance well at all. They stuck to the floor when I turned and had absolutely zero arch support because of the split sole. However, they received many compliments and envious glances for their cuteness. Verdict: You do not need split soled shoes for line dancing. Shoes that stick are no good even if they are cute. You can't dance on compliments. Follow up: I bought a sheet of adhesive suede that I cut and put on the bottom of these shoes. They are now useable. The split arch doesn't provide enough support for me so I also include an orthotic. I recommend buying a sheet of adhesive suede to cut to fit the sole of your favorite shoes. Update: I have given away these shoes because they simply didn't offer enough support for hours of dancing. I have also learned that friends I dance with have put the suede on the bottom of their favorite trainers and dance in those each week. I want to try this too and report back. (10/15/2022) 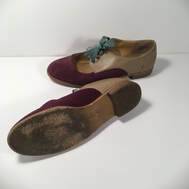 One day at a thrift store I found a custom pair of leather dance shoes that were just my size. They dance very well, but there's no padding in the shoe and they tend to make my feet sweat. Verdict: Someone else's custom leather dance shoes are just okay. Follow up: These are great at the local recreational center where we dance on a dirty, sometimes sticky, linoleum floor. Update: Turns out these were the only shoes I owned that the ortho would let me start dancing in after I broke my foot. I have added all kinds of cushions inside the shoe to make it more comfortable. (10/15/2022) 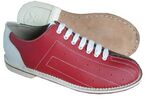 I have considered, but not yet tried, bowling shoes. My parents danced for years in their bowling shoes because they have a leather sole, are comfortable, and provide great support. Verdict: Good enough for Mom and Dad, I'd be willing to try it.  Because I spend a lot of time dancing on floors of varying quality, I've invested in a pair of shoes that are essentially dance sneakers. These shoes allow me to insert my orthotics, provide good slide on the dance floor without being slippery, and allow me to dance for many hours blister free. I will definitely buy another pair when these wear out. I bought these shoes from Dance Connections. Verdict: Dance sneakers are my go to shoe when I can find them! Update: I bought a pair of brown 10.5 boots from Dance Connection Shoes that were too snug. I returned them but never received my refund, so I will no longer recommend Dance Connection Shoes. I now buy my shoes from swaydshoes.com. I like their suede sole dance boots but none of these shoes have enough cushion for the ball of my foot. So while I wear them to teach for 1-2 hours, for a typical night of 4.5 hours of dancing, I wear sketchers with the dance socks. (10/15/2022)
I hope you've learned something from my experience and I can save your joints some pain and your wallet some money. Let me know what you're dancing in in the comments below! May 13th I taught 3 beginner line dances as a guest instructor at Rita Turner's Wow! Dance on the Move class at Jackie Robinson Community Center, 1020 N Fair Oaks Ave. Pasadena, CA 91103. They meet Monday nights 6-7:30pm where Rita teaches soul line dancing.
That night I taught the dances: I'm Free Choreographed May 2017 by Raymond Sarlemijn and Roy Verdonk from the Netherlands and Jill Babinec from USA To the song Love my Life (Adam Turner and James Hurr Remix) by Robbie Williams. Tush Push Choreopgraphed by Jim Ferrazzano To the song Just a Gigilo by David Lee Roth Power Jam (San Diego Version) Choreographer unknown To the song Don't Stop 'Til You Get Enough by Michael Jackson |
Sherry BarrettStay updated with where I am teaching and the dances I teach. I will also explain difficult steps and help you grow your dance knowledge. Archives
October 2019
Categories |
||||
 RSS Feed