 I had a professor in college who loved to quote at me, "Art is 1% inspiration and 99% perspiration." He was basically telling me to get to work drawing. I can, and will do the work of drawing, but it seems a waste of time drawing something that doesn't even have 1% of inspiration. I'm basically a copy machine at that point.
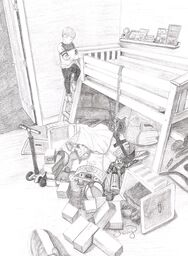
For years I have worked off and on trying to draw a messy child's room for a blog that I illustrate. The writer had the story written, I just couldn't put the image together in a way that worked for me or my client. I asked friends to send me photos of their messy rooms and scoured images online. All the photos were missing something? I attempted several drawings on the messy room concept, hoping I'd figure it out as I went. But, no luck. I don't know how or when I realized it, but I decided I would have to stage the tragedy. Good friends had me and my husband over for a delicious dinner of smoked ribs. When dinner was over I asked their son if he would like to make a mess in his room with me. He ran to his mom and asked, "Can Auntie Sherry and I make a teeny, tiny mess in my room?" His Mom graciously gave us permission to trash his room. I brought over lighting, a step ladder, and some of my own "messy items" to get a certain look. My helper enthusiastically threw everything off his bed onto the floor to add authenticity to the situation. It was fun to make the mess and it took about 35 seconds. I climbed my step ladder and took some reference photos with my phone. I called in my actors as I pulled out my freshly charged Olympus DSLR. Dang it! I forgot to reinstall the memory card. I know I have an extra but don't want to waste time formatting it. No fears, I have my Canon point and shoot that does pretty well. I also remembered my I-Pad pro has a great camera so I took some photos with that. We took dozens of photos with variations of Mom, Dad, and child here and there. I learned that when working with a 5 year old you need to make decisions and take the photos quickly. Fun as the mess was to make, the picture taking is boring. Also, it's hard on Mom and Dad to be down on their knees. So, I didn't drag out the photo session trying to get the perfect shot. I took lots of photos from various angles: high, low, behind, in front, and from the side trusting I could cobble something together at the end; or, at least know how to go back and do it right. I narrowed down the options to about 10 for my client to go through and low and behold, the client chose one of the reference photos of the mess that I took early on with my phone. No acting or staging or coaching or coaxing required. My young assistant nailed it in the background just being a kid doing what kids do in a messy situation. We finally found the inspiration we needed and that project was published by the end of the week. I don't know why some images take so long to find? Maybe they're not ready to be born yet? Maybe I'm not ready to parent them? I don't know, but, I find the drawing comes so much easier for me when I start with that 1% inspiration.
0 Comments
 I remember when my high school art teacher, Mrs. O'Neil, put this really complicated drawing in front of me. She placed it upside down and told me to copy it. I immediately, tried to turn it right side up and she said, "No. Don't turn it around. Draw it upside down." I told her, "I can't tell what it is." She said, "You don't need to know what it is. Just draw it. One line at a time." I huffed and puffed, felt frustrated, thought she was crazy, looked around the room, and then my art brain picked up my pencil and got to work. I don't remember deciding to do what she said, but my artself just took over and did it.
You might notice that my last blog was over a year ago. That's when my world turned upside down. In October 2019 I learned I would once again be asked to draw upside down because we would be putting our house on the market in February 2020 to move across the country for my husband to start a new business. Time to purge 9 years of accumulated stuff, paint the house, trim the shrubs and take care of business. Business included driving my son across the country in January to start a new job and find an apartment. Selling my house. Moving my daughter into an apartment closer to her job that she would never return to because in March 2020 everyone joined my personal chaos in the form of a pandemic stay at home order. I, however, couldn't stay at home because I sold it. I needed to buy a house, ship a car, drive a car, ship our stuff. Life goes on pandemic or no, we get to keep drawing even when we don't know how the picture will turn out, one line at a time. So, how am I surviving drawing upside down in the middle of a pandemic? I am trying to keep the main things the main things any way I can. Soul - I pray often. I don't pray well, but I pray. I try to listen, but often hear silence. I play the Daily Audio Bible in the morning when I don’t feel like getting out of bed; so, yeah, daily. I go to a church where everyone wears a mask and social distances properly because I need a life rhythm that involves me leaving the house. Please tend your soul during this time, if you don’t you will whither from the inside out. Mind -It’s been a good time for me to be introspective and think about what I really want and what I can and can't do. I've thought about what I really "need" to be a healthy person. I've accepted the fact that I am an extrovert and no matter how many introverts online yell at me to stay home, my reality is, "Friends are fuel." So, I see any friend who will see me so I don't end up a car out of gas on the side of the road being towed to a mental institution. Please practice mental hygiene and air out your dirty and/or sad thoughts. Don’t hurt anyone with them, just air them. Then, fold them away to make room for cleaner and/or happier thoughts. If you don’t know how, therapy is worth every penny. Body - I’ve joined a gym because my body is seizing up staying inside this winter. I made an appointment with an orthopedist when I discovered I couldn’t do a chest press with 2 pounds. Turns out that chronic shoulder pain was an inflamed rotator cuff and bicep muscle. No surgery needed, just anti-inflammatories and PT. I made an appointment with an eye doctor because I was using two pairs of glasses like a microscope to draw fine detail! LOL! Thank you for the recommendation artist friend Monica Agri-Bowes - it got the job done. Good news, new glasses are on their way. Blue! I'll try to post a pic. Have you let a health issue go too far? If you can get an appointment, get the help you need. You are worthy. Art - I hired an artist mentor because I feared I would completely abandon my art in the midst of the crushing demands of "real life”. My mentor has helped me keep art inside the frame of “real life” and moving in a positive direction. I've continued to illustrate a weekly blog even when I don't feel I have the emotional or physical energy because I want that to be a part of my real life too. I’ve also applied to art school because I’m half way through my life and not halfway to where I want to be as an artist. I have pulled 3 other ladies to me and we do studio time together online once a week. I love looking up from my drawing to see these ladies who live in Georgia, Ontario, Canada, and Massachusetts working away. We encourage and challenge each other to keep making art and provide useful feedback and critique. Do you have support in your work environment? Find support. This past year I haven't been writing on the blog because I haven't been in a position to do so. I've been drawing one line at a time. I decided to pop in here to share what some of my lines have turned into for my soul, mind, body, and art even though I still can’t see the completed picture. In high school, the completed picture turned out to be 3 jackets. My copy was spot on. I’m not sure I could have done it right side up because the amount of detail was overwhelming. My teacher, in her wisdom, turned the image upside down so I could reach the goal by focusing on one line at a time. If you are feeling particularly lonely this year, please hold on. You are not alone, you just can't see the completed picture. You are loved. You matter. Trust me. Happy Valentine’s Day from SherryBarrettArt! 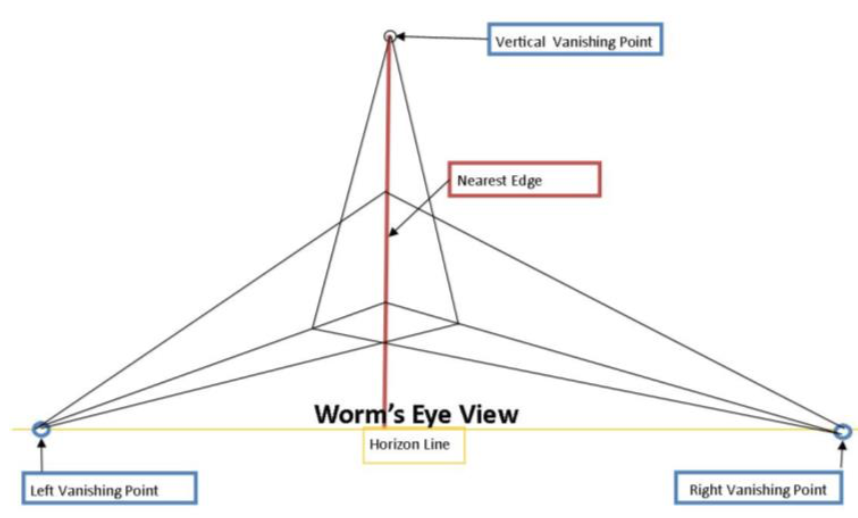  Three point, or oblique perspective, is helpful when drawing a very tall building from ground level; or, when looking down from a very high vantage point. Three-point perspective often reveals 3 sides of an object with the help of 3 vanishing points. Two of the vanishing points are located on the horizon line and the third point is located either above the horizon line for a worm's eye view or below the horizon for a bird's eye view. The horizon line is always placed at the the viewer's eye level. Place the horizon line near the top of the paper to present your bird's eye view or the bottom of the paper to get the worm's eye level. Keep in mind, there are no horizontal or vertical lines in 3-point perspective as every line recedes to a vanishing point. 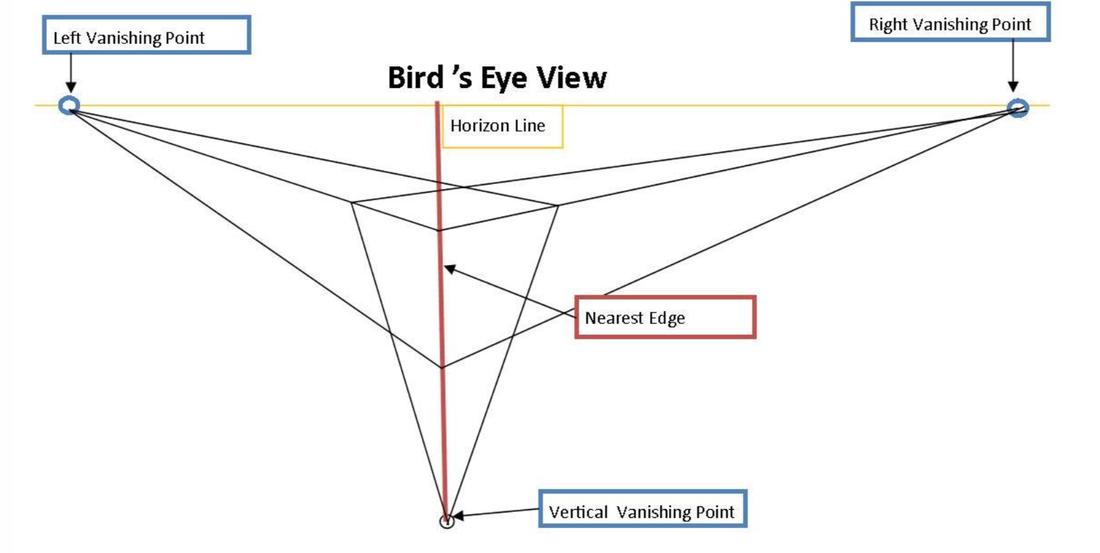  Practice 3-Point Perspective:
1. Draw the horizon line at your eye level and vertical line closest to you. 2. Draw the angle from the top of that line to the vanishing point to the left on the horizon line. Next, draw from the bottom of that line to the same vanishing point. 3. Determine the slant from the right of the vertical line and draw a line from the top of the vertical to the horizon to determine the right vanishing point on. Now, draw the lower line on the right. 4. To determine the vertical vanishing point, decide the width of each side of the cube and the angle of those lines. At the intersection you will find the third vanishing point. It will be perpendicular to the horizon.  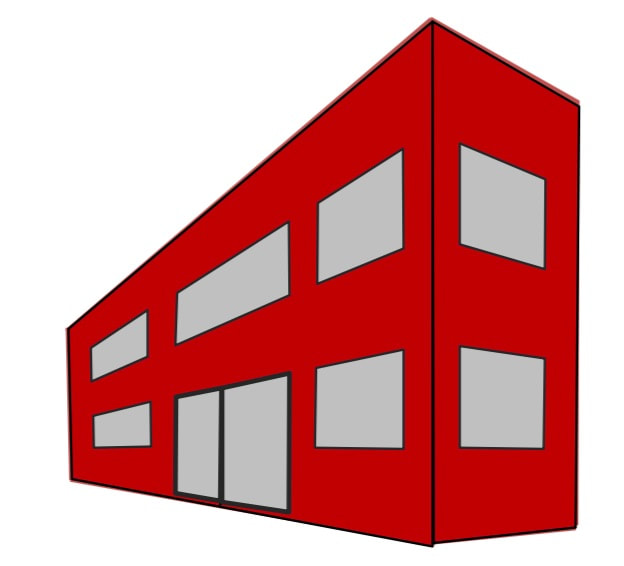 Two point perspective is also known as angular perspective and can be observed by standing in front of the corner of a building. From this "street" view we can see the left and right sides of the building but we can’t see the top or the bottom. We observe two sets of parallel lines receding to two separate vanishing points on the horizon.
Practice Two Point Perspective:
One point perspective can be very dramatic when used to effect as I did in my painting #Me Too-Hope In Release. Today, I explain the basics of one point perspective as you might use them in drawing a fish tank, a box of crackers or a road vanishing in the distance. Get out a ruler and have fun creating fantastical images using one point perspective. 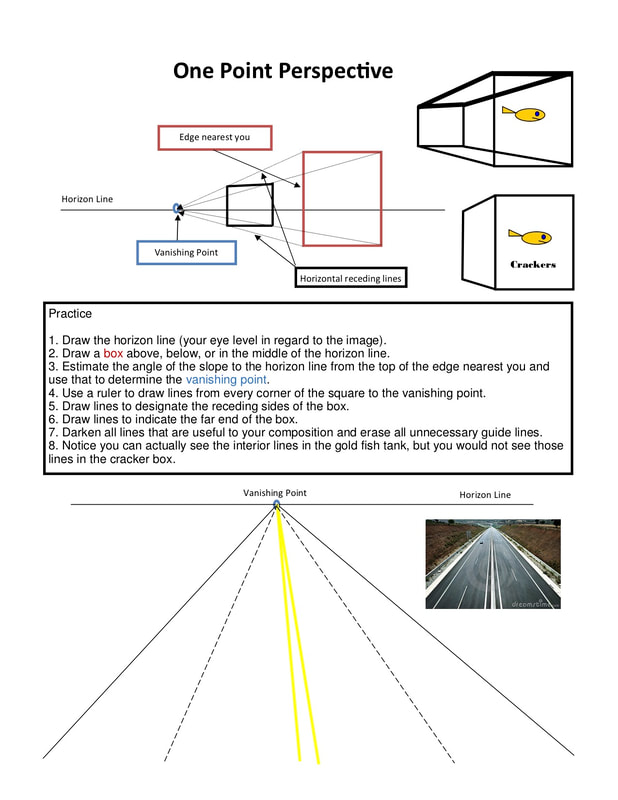 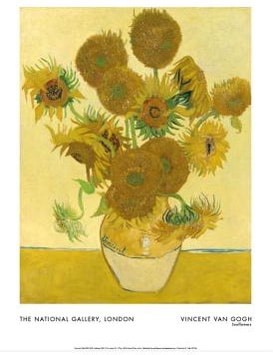 One day, while zooming down the stairs of The National Gallery in London to see a collection of Gaugin paintings on loan, I was stopped in my tracks by a famous painting. I had never cared to see this painting because I had seen prints of it in art books and on dorm room walls; and, frankly, I wasn’t impressed. But, here, in it’s original splendor, on the landing of a stairway, I was transfixed.
The painting was Van Gogh’s Sunflowers. I could not believe how beautiful it was, how vibrant the colors were, the background looked like real gold, and the flowers almost seemed to dance on the canvas. I could feel the warmth from the colors in this painting. I was humbled and captivated by this painting. The description informed me that Van Gogh intended this painting for his guest bedroom where Gaugin stayed for some time. I later recounted this encounter as a secular-religious experience until a friend informed me there is no such thing as a secular-religious experience. She made the point that I had encountered the divine in the mundane. I have another friend who told me nothing is mundane, everything belongs to God. Just like God to be everywhere and reveal himself to us in countless unique ways. Has this ever happened to you? Think for a minute, have you ever encountered God in the mundane? Do you have a story you tell over and over because it was such an unusual occurrence? Jot down any thoughts that come without judging them, like a brain storm session. When my friend told me I had encountered the divine in the mundane, I was sad that I didn’t know it at the time. I was concerned that maybe I had missed a golden opportunity. Fortunately, God is not limited by time and space; so, I prayed and asked God, “Why did that painting strike me? What would you like to reveal to me through that painting?” It came to me that when we encounter God, we know it on some level whether we have words for it or not. And, God is more vivid and captivating than any cheap image the media might try to give us of him. In life, don’t settle for the cheap imitations of God the world will offer, such as an old guy in a robe smiting people. There is a world of difference to be found in the real thing. Finally, God is warmth and light and something tells me he has the most inviting guest bedrooms ever. Try this mental exercise I created:
You may be disappointed, or delighted, to learn that I fly through art museums. I have a short attention span so I need to get in and see all the good stuff before I get bored by the boring stuff. I scan the walls of a room to see what the general vibe is and if I like I enter; if not, I move on. I am not interested in all art. This may sound very illiberal and close minded of me; but let’s face facts, there are millions of artworks in this world and I have better things to do with my life than learn to appreciate art that makes me want to throw up. I don’t want those images stuck in my mind giving me nightmares. Also, I have seen enough Renaissance art and formal portraits to last me a lifetime and I don’t have 15 minutes to watch the video of your plastic bag floating in the wind. I choose not to interact with these images and artists because life is short, brain storage is limited, and I can meet you in the next room. If you still want to visit a museum with me, I will share with you my practice.
 In 2010 I had to figure out what faith looked like so I could paint it. I was creating a series of paintings inspired by the life of St. Nicholas for a church of the same name. While summarizing my research the word faith kept coming back to describe how St. Nicholas lived his life. I couldn't get around faith so I had to dive into it. I now teach the method I used to find my image and I call it The Devotional Art Process. I still practice this process when I am trying to create an artwork to help me understand Biblical truths, solidify important life lessons learned, or remember things I don’t want to forget. I think you'll find this method useful if you too are trying to come up with an original work of art that will communicate more than a mere representation of things that already exists.
The Devotional Art Process 1. Ask God for help. Whenever I begin a new task I say, “Here I am God, use me.” In this way, I am inviting the divine to reveal what he will to me. I am letting inspiration know that I am sitting down to work and it may visit me any time, the sooner the better! 2. Flesh out the concept. I never have trouble with a blank sheet of paper because I just do a brain dump first thing to try to see what I already know or can know. A brain dump looks something like this:
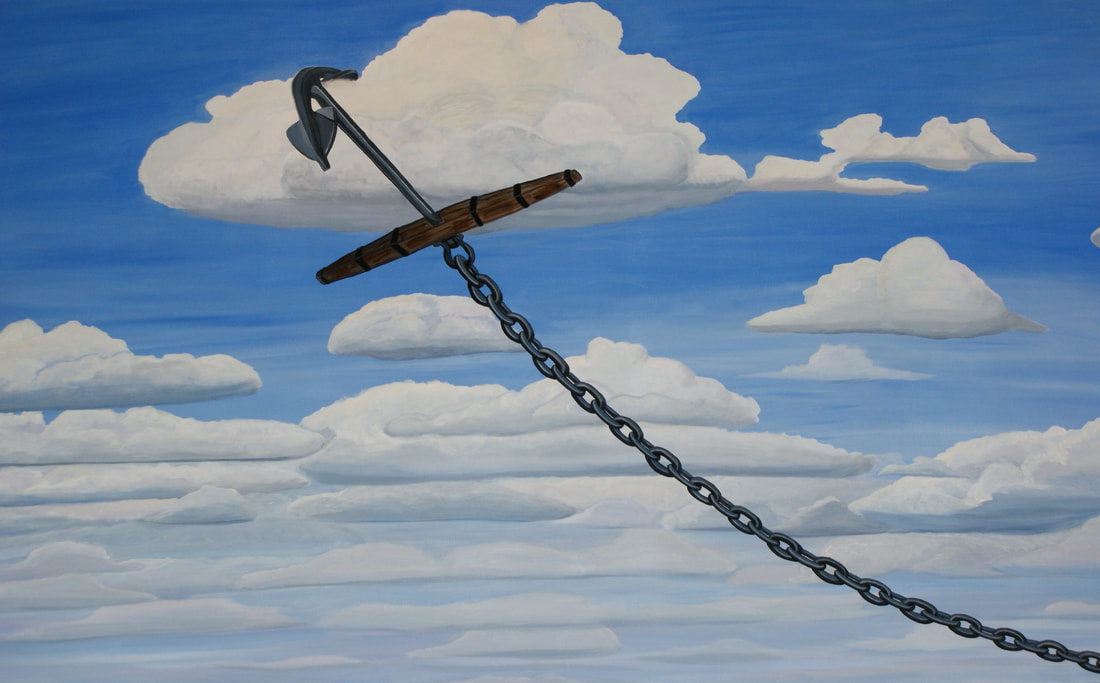
4. Create the final image. 5. Share the final image with others and receive feedback. In my “Faith” painting (pictured above), you see an anchor firmly caught in a cloud to represent St. Nicholas’ faith pointing others to God. I decided on this image because you can't really see "faith", you feel it. It made me think of boating. You can’t see if your anchor is holding onto anything under the water but you can feel it’s found something to hold because you don’t drift away with the tide or current. Likewise, when believers cast the anchor of their faith into the heavens, they learn that God holds them steady through the currents and tides of life. 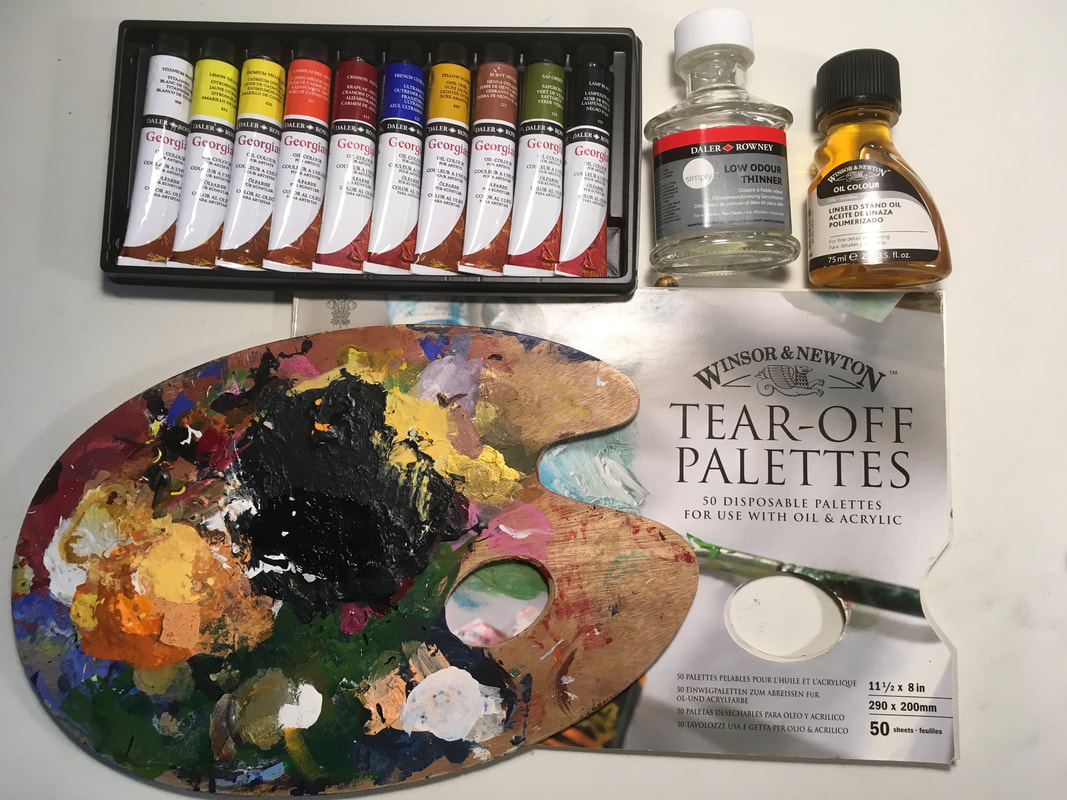 Every art teacher has their own opinion on the subject of art supplies, but I'll tell you what has worked well for me. I like to begin with what I already have on hand and so I started my first oil painting class with one of those gift box sets of oil paints and brushes and a Bob Ross paint kit. Those two kits served me well until I knew enough to choose new supplies for myself. When gathering supplies to begin oil painting you'll need: Newspaper - to protect tables and floors Smock or Apron - to protect your clothing Linseed Stand Oil - to create medium Turpentine - to create medium and clean up oil paint Oil paints - red, yellow, blue, black, white Paint Brushes - Variety of sizes (2, 4, 6) and shapes (Filbert, Liner, Flat, Round) Wooden Pallette or Tear-off Pallettes - for mixing paints Two small jars - one with turpentine the other with turpentine linseed mixture Rags or paper towels - for wiping excess paint off brushes Canvas - You can gesso cardboard or wood; or, use a canvas board Table top easel - Makes long painting sessions more comfortable ***Gloves and Low Odor Thinner - I am allergic/sensitive to everything so I prefer to use Low Odor Thinner in place of turpentine and wear disposable gloves when I paint with oils. It's also a good idea to wear gloves when using Flake White paint which contains lead. (We know lead is what made artists crazy back in the day and let's face it, we're crazy enough these days without assistance). When purchasing oil paints, I recommend Winsor & Newton or Daler Rowney brand because they are affordable and have a great range of colors. When trying a new color, purchase a small tube (22ml) in case you don’t like it. Buy large tubes to replace colors as you run out of them. It's good to have a variety of warm and cool colors and you will learn that certain colors are transparent (Ivory Black) while others are more opaque (Flake White). Beginning palette of colors:
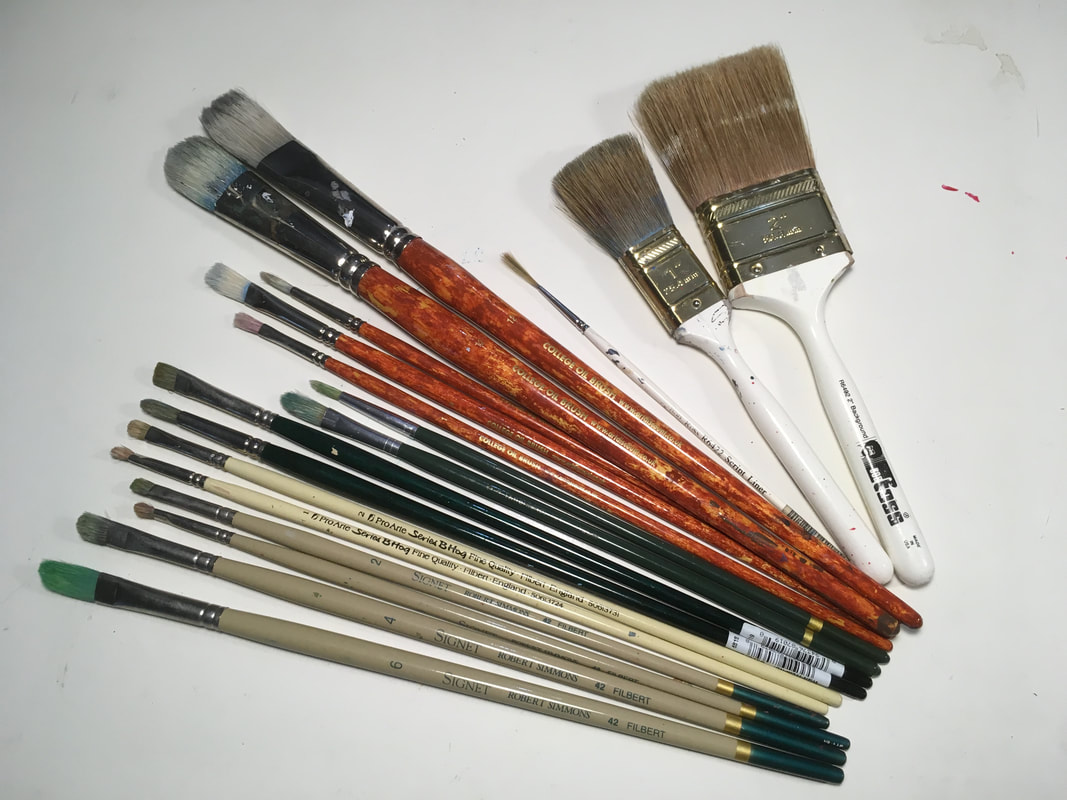 These are the brushes I reach for every time I start an oil painting. You may notice I have several of the same size and shape, that's because there are times when I use one brush per paint color to keep my colors from getting muddy. Above pictured I have: Signet Robert Simmons 42, Filbert, 6, 4, 2, 1 ProArte Series B Hog, Filbert 2, 1 Winton, Round Fine Hog, 4 Winton, Short Flat/Bright Fine Hog 4 Langnickel, Filbert 4, Round 2 College Oil Brush, Filbert 1, 2, Round 2, Filbert 12, Flat 12, Bob Ross Script Liner, 1” Landscape, 2” Background If you need to buy brushes I would recommend buying these hog hair brushes: 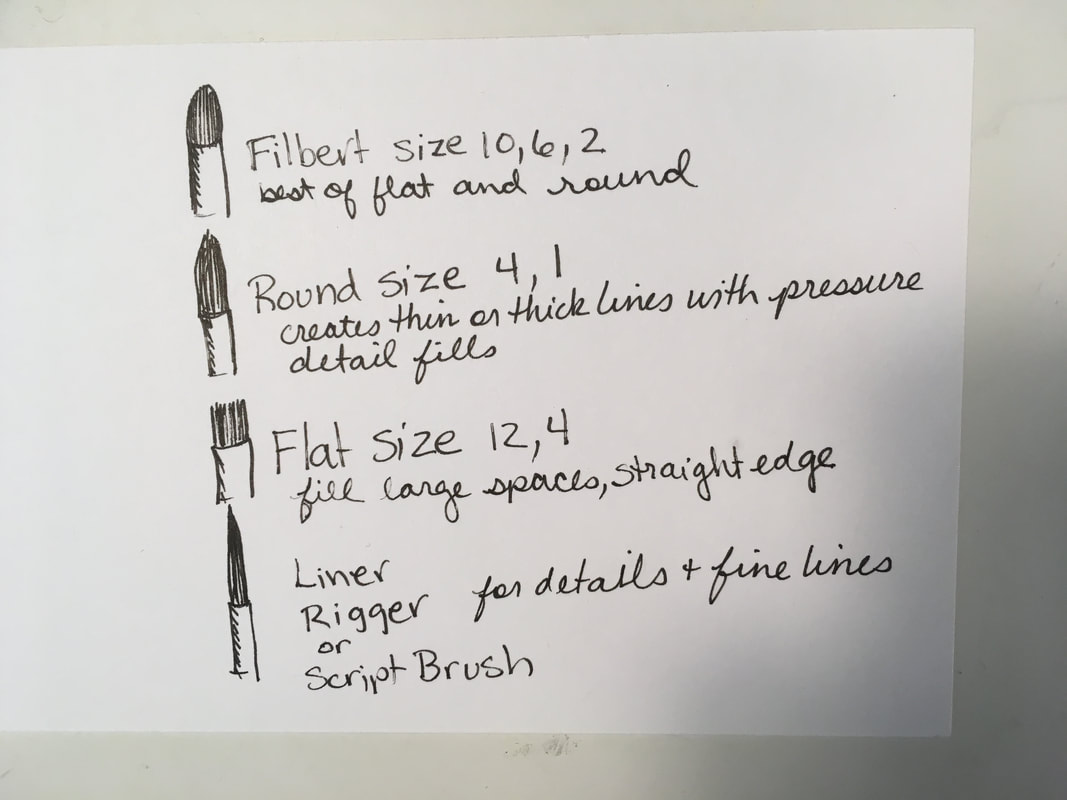 Oil painting takes some time to perfect, but the color richness makes it well worth it. Unlike acrylic and water color painting, oil paints are slow to dry. When living in England I had to wait a full week between layers of paint. You may be thinking what do you mean layers of paint? That's the magic of oil painting, around layer three, the layers of color begin to show through each other creating a beautiful depth and richness. Oil painting is one medium where I suggest you must get a book from the library or take a class. There are so many tips and tricks and ways of using this medium.
One tip I learned in class that I'll share with you involves acrylic paint of all things. It was a one day class painting in the tradition of the Old Masters and he had us begin by painting a greyscale version of the still-life using acrylic black and white. After we completed the black and white acrylic painting, which dries in minutes, we began adding layers of colored glazes over the oranges, bananas and plums. It was like magic as we placed the color and added highlights! So, if you're in a hurry, like me, consider an acrylic underpainting. But, you must never paint acrylic over an oil painting because the acrylic (which is water based paint) will not adhere to the oil (which is oil based paint). You know what they say about oil and water repelling each other! Anyone can draw a person and get everyone to say, “Oh, that’s a person.”
O>-< See, I just did it using a keyboard. You might even say the person is lying down. But, you wouldn’t say it looks like anyone you know. It’s a symbol for person. Our brains are full of symbols for trees, flowers, rainbows and many other things that allow us to draw quickly when playing Pictionary and get the desired answer. But, these symbols are unsatisfying when we are trying to achieve the likeness of a family member. So, how does one get to the point of drawing things as they look to the critical mind? Here are some tips to get you moving in the right direction. #1: Work from photographs you’ve taken. From my experience, realism requires drawing from the real thing. I’ve been drawing off and on my entire life and I cannot whip out a realistic anything from my mind. I can make some cute cartoons or caricatures, and I’m an excellent Pictionary partner, but, if you want realism from me I need to be in front of the thing; or, better yet, a photograph. Photographs are helpful when learning because they can’t blink or move out of place and the lighting won’t change with the movement of the sun. The photograph also does the hard work of translating the 3-D object into a 2-D form. #2: Draw on a large sheet of paper . Trust me, you do not want to draw a full length portrait in a 4”x6” journal. You would need the steadiness of a surgeon to place every mark where it needs to be. I once did a small pencil drawing of my daughter and she looked crazy in the 6” x 9” sketch. I kept looking and looking trying to see what I did wrong. I had to erase the corner of her eye and draw the corner with one pencil dot. With one dab of the pencil it was perfect, but, I had to remove the dash that was wrong so I could place the dot to get it right. A DOT! Larger formats are more forgiving and provide more room for error. #3: Spend more time looking at the subject than your drawing. Don’t dive into drawing right away. Sit there and really look at what you’re drawing for a minimum of 5 minutes. Set a timer. Spend that time tracing every line you see using your imagination. Where are the darkest darks and the lightest lights? Is this composition short and wide or tall and thin? Plan how you will put it on the paper: horizontal or vertical? Will you use a 2B or 6B pencil to draw a baby? What part of the image do you want at the center of your paper? What do you like most about what you’re looking at? Don’t lose that! What is in front and what fades into the background? Really map out the drawing in your mind. #4: Realism requires questions, corrections, erasers, and rulers. For realism to blossom, your perspective lines must be spot on, your horizon needs to be level, the walls of your house need to be straight, and the person’s face must be in proportion to itself. Break out your library card and check out books on perspective, proportions, and drawing realistic faces. Erase errant marks and straighten wavy lines. You must keep looking at the original and compare it with the marks you just put on the paper. Does your line have the same slope? Correct it. Is the house really taller than the tree? Yes, it is a newly planted tree. Reassure yourself because your brain might try to make the tree to tall. #5: Draw something, or someone, to whom you aren’t emotionally connected. We are often unsatisfied with subjects we know very well because we are experts on the subject and emotions can complicate things. Our logical brain says, "Something isn't quite right with this drawing.” Our pet can look like a stuffed animal instead of the warm, charming critter we know them to be. While you are learning to draw more realistically, maybe avoid friends, family and pets for subjects. If you simply must draw a precious subject, consider turning your picture upside down and doing the drawing upside down. It somehow tricks that bossy, doubtful side of your brain so it doesn't quite recognize what you're up to. #6: Practice and patience lead to improvement, not perfection. As you practice drawing you are building your visual vocabulary of how you create various 3-D objects on a 2-D surface. You don't need to be as perfect as a camera because you are not a piece of machinery. But, with enough practice, you just might trick the human eye. Artists are playing an instrument that requires practice and tuning. Just like musicians, artists must practice 8 hours a day to perfect their performance. But even musicians who play a piece perfectly as written, can sound a little different. That’s the magic of humans and snowflakes, no two alike. Artists put a bit of themselves on the paper and that’s okay, even in realism. It takes patience and persistence to achieve a realistic replication of an image and the artist must push through the moment when they most want to quit because that is often the moment they are on the verge of a breakthrough. Remember, what you draw tomorrow will be better than what you drew today because you never stop learning and improving. 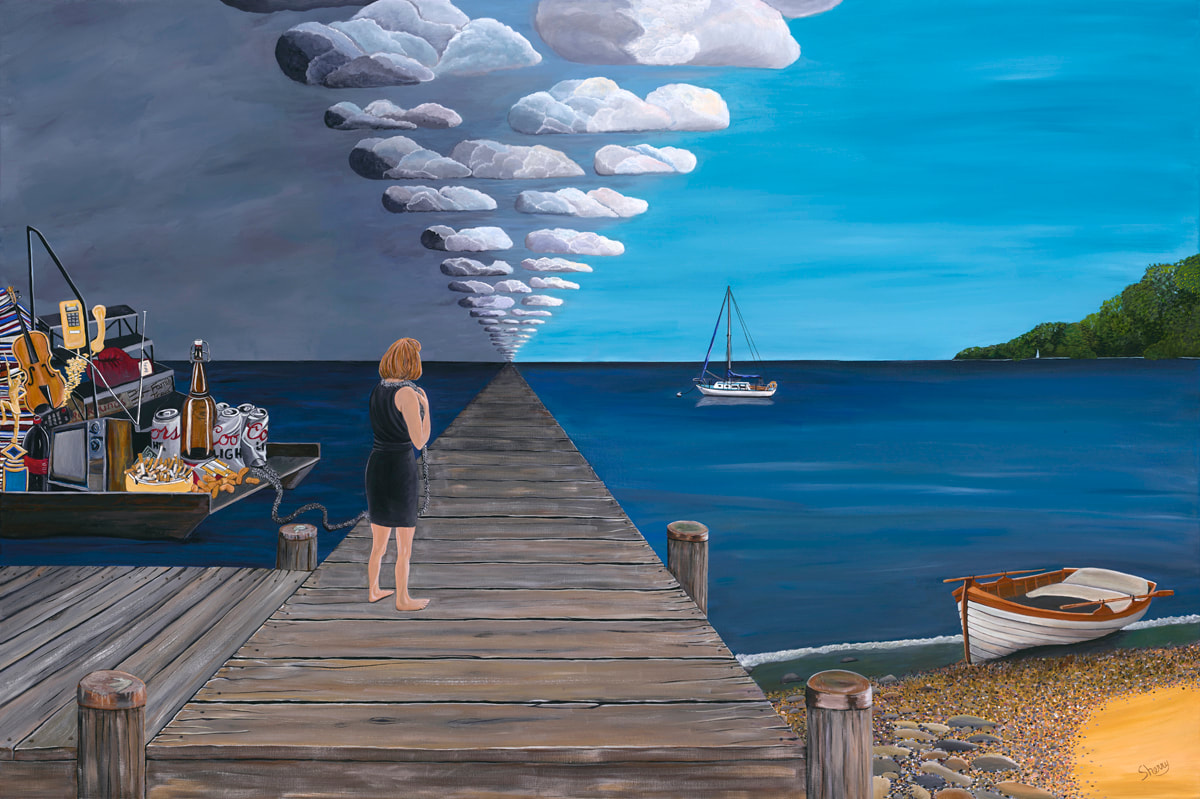 A student from my alma mater was writing an article for The Chimes about Calvin Alumni who entered ArtPrize this year and saw my name listed on Calvin’s website. She asked me to answer the following three questions; and, although I didn’t get back to her in time for her publication deadline I thought I’d share my answers with you.
-How did Calvin College impact your journey as an artist? My Calvin education taught me to care for our culture and contribute to the redeeming work Christ is doing in my sphere of influence. I take that charge seriously and hope it informs my work. On a practical level, photography and graphic design classes I took really inform my process as an artist. -What inspired this installation and what is your hope for how the public interacts with it? I was deeply touched by the #MeToo movement and the number of people it has affected. A few years ago I drew the image of a woman on a pier tied to a barge of trash for a friend. She was sexually abused as a child and this was an image that came to her in her healing process. The meaning, she discovered, was that she should forgive her grandfather and let go of those memories so she could move forward in freedom and not have those past events define her. It didn't matter who put the rope around her neck, she could take it off. She suggested the image could be improved if I painted my own trash and what freedom would look like for me. I was not eager to undertake this project and was avoiding it until I saw a Facebook video on forgiveness that gave me the title for my painting. I realized art could begin a journey for others who need to find healing for their past through forgiveness. They may not find justice, but they can find freedom. On my website I have links to many tools for working out forgiveness that I've come across since undertaking this project. My hope is that this painting will provide a way forward for those who are still held hostage to painful memories tied to them by un-forgiveness. -Have you entered anything in ArtPrize before? This is my first year participating in ArtPrize. I chose to enter ArtPrize so that this painting might contribute to the conversation around #MeToo in our country. These problems won't be solved in the courts or legislature; but, by individuals taking courageous steps to heal their fractured identity. Challenging Tech: Artist Approaches to Creating, Communicating and Influencing
Notes From ArtPrize Artist Week September 18, 2018 speaker Matthew Patulski SECURE DIGITAL IMAGES
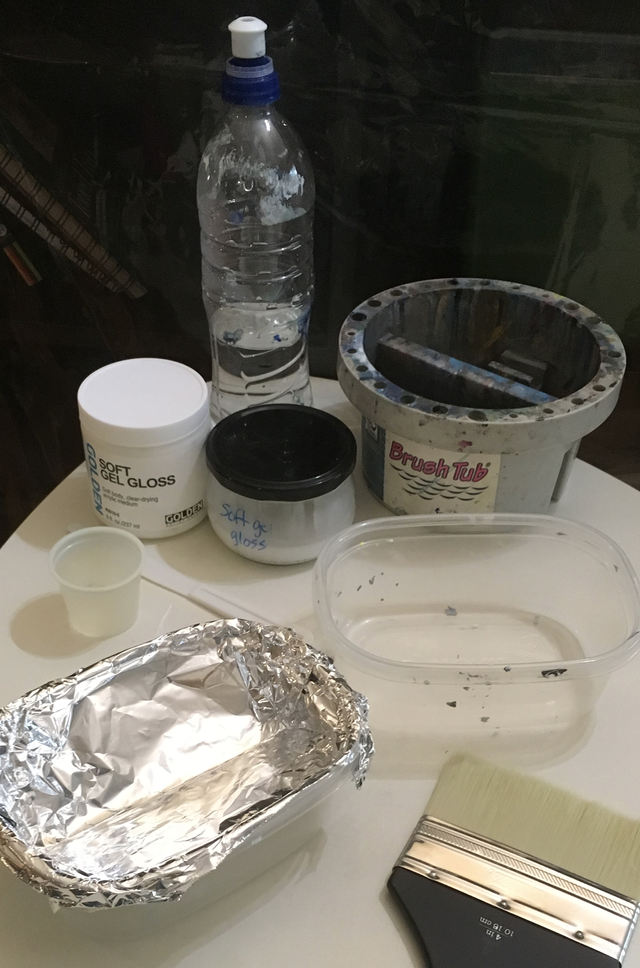
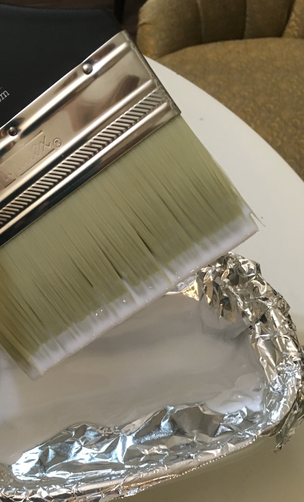
It’s important to protect acrylic paintings you like by varnishing or framing them behind glass. Acrylic paintings can get dirty like any other plastic object in your house, imagine an exploding soda or great-aunt Edna smoking. A proper varnishing is the most cost effective solution for large canvas paintings. I recently varnished a 4’ x 6’ acrylic painting and thought I’d share what I learned. Let it be known, there is the right way to do things and then there is your way to do things. You have to do what works for you, your space, and your budget. Disclaimer: Always follow manufacturer’s directions, even if I don’t.
Equipment:
 I haven’t written a blog for a while because I am in, what my family refers to as, ”mad scientist mode". Mad Scientist Mode means I don’t do my hair or makeup, I wear paint covered clothing every day, I paint, I sleep, occasionally eating when reminded, and leave the studio only when necessary. I send the briefest texts and emails to friends and shorten the phone calls with family. I’m not available for lunch dates or play dates. I am not sad or mad at you, I hope I am not rude or hurtful, I am just a mad scientist on the verge of an artistic break through in my lab and I cannot be bothered until there is success or an explosion. (The above image is the bottom right hand corner of the all-consuming 4'x6' painting I'm working on.)
In March I got the idea for a painting that I thought might land a spot in Art Prize. I started work immediately because I have to convince someone that this painting is awesome before June 28th so I can be part of the show in September. So, every day I plug away at the painting and each day it looks more awesome. I can easily pass a day lost in the joy of the minutia of the painting. Don’t get me wrong there are other times when I have to walk away because something isn’t working and I'm frustrated, but that’s what happens when you’re creating something that doesn’t yet exist. It takes time to figure out this world and its conventions. It amazes me how my brain seems always to be working the painting in the back of my mind as I do other things. Suddenly in the middle of making dinner I’ll get an idea for how to fix something and then I can’t wait to get a paint brush in my hand and see if I’ve actually solved my problem. This painting is definitely testing me. It's exhausted working as a slave with or without inspiration. I like the instant gratification of drawing and really haven’t painted anything this big and detailed and personal…well…ever. I find myself hearing in my mind the advice I often give my students….keep adding information, add shadows and highlights, add the next level of detail. Don’t give up, the more information you add the more the painting will make sense and come alive. Sure enough, while a sand beach will do, I’ve learned that a pebble beach is magnificent. While a vague impressionist style contains all the necessary information, realism can be a more powerful communicator. It's okay that no part of the painting is finished until the entire painting is finished. Tweaks are necessary to keep large paintings cohesive. It’s exhausting infusing a painting with yourself and your experiences, but the painting takes on a new level of believability, intimacy, and power when we’re brave. So, I’m afraid my blog and instructional You Tube videos will necessarily be interrupted by Mad Scientist moments. As an artist, I am a slave to inspiration when it comes and calls my name. I must answer. If I don’t, inspiration will leave me and find someone else to bring it to life. So, I beg your patience as I pour my heart and soul on a canvas and try to capture for you to see what inspiration has whispered in my ear. Once the painting is finished, I will return to blogging and YouTubing, hair and makeup, cooking and cleaning and lunches with friends. Until then, I'm in a different kind of good place. I hope you too will listen for, and surrender to, inspiration in your life and see where it leads. 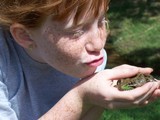 "While discussing the growing antipathy toward Christians, a friend remarked to me, "There are three kinds of Christians that outsiders to the faith still respect: pilgrims, activists, and artists. The uncommitted will listen to them far sooner than to an evangelist or apologist." Although nonbelievers do not oppose a spiritual search, they will listen only to those Christians who present themselves as fellow-pilgrims on the way rather than as part of a superior class who has already arrived. Activists express their faith in the most persuasive way of all, by their deeds. And art succeeds when it speaks most authentically to the human condition; when believers do so with skill, again the world takes note." Philip Yancey, Vanishing Grace p. 89
As artists, we have the opportunity to be grace dispensers. We can add to the truth and beauty of the human experience. It is important that we are the best artists we can be so that our lack of skill does not impede the image we feel compelled to share. If we do our job well, we should bring hope, clarity and a curiosity about what we believe and why we live our life the way we do. Artists are not needed to add to the chaos and noise of our world. There is plenty of ugliness on display in the nightly news. Sadly, I can’t undo the tragedy that happened at a Florida school last week, but I can accept the invitation to share in the task of dispensing grace and hope to a hurting world. How will you be a grace dispenser today? Art Group met at my house last night. I love my art group. There are six of us who get together to paint, draw, and just talk about our lives nearly every week of the year. Sounds perfect doesn't it. To be honest, I never want to go to art group, or host art group, even though I love art group. I'm lazy, we meet at night, and I just want to be in my pajamas and go to sleep at night because I'm really not my best self at night; but, once we're together there is no other place I'd rather be. The Newcomer's Art Club in Oxford, England really saved my sanity in so many ways for those years I lived abroad. Having someone who's glad to see you every week is important. Some people don't have the luxury of getting together with friends to paint. Many schools across the country are cutting art programs all together. I've been thinking about how I can help those who long to be creative but don't know how to go it alone, maybe expatriates in a foreign country, or who live in a rural community, or for one reason or another don't have friends to paint with or access to friendly, non-competitive instruction. So, I've started a YouTube channel. It's nothing fancy, just me teaching you how to do some art that I'm interested in and giving you tips and tricks along the way. I know I'm not really there with you, but I hope it feels like you have a friendly, encouraging artist friend in me who will help you try new things, cheer you along the way, and answer any questions you have about art. If you like me or love me please subscribe to my YouTube channel so that it will become more findable for the people who need it most. Thanks for all the support you give me friends! I appreciate you. Check out my introduction video and share this url with friends you think would benefit: www.youtube.com/watch?v=Xq3FX4HOOQ0 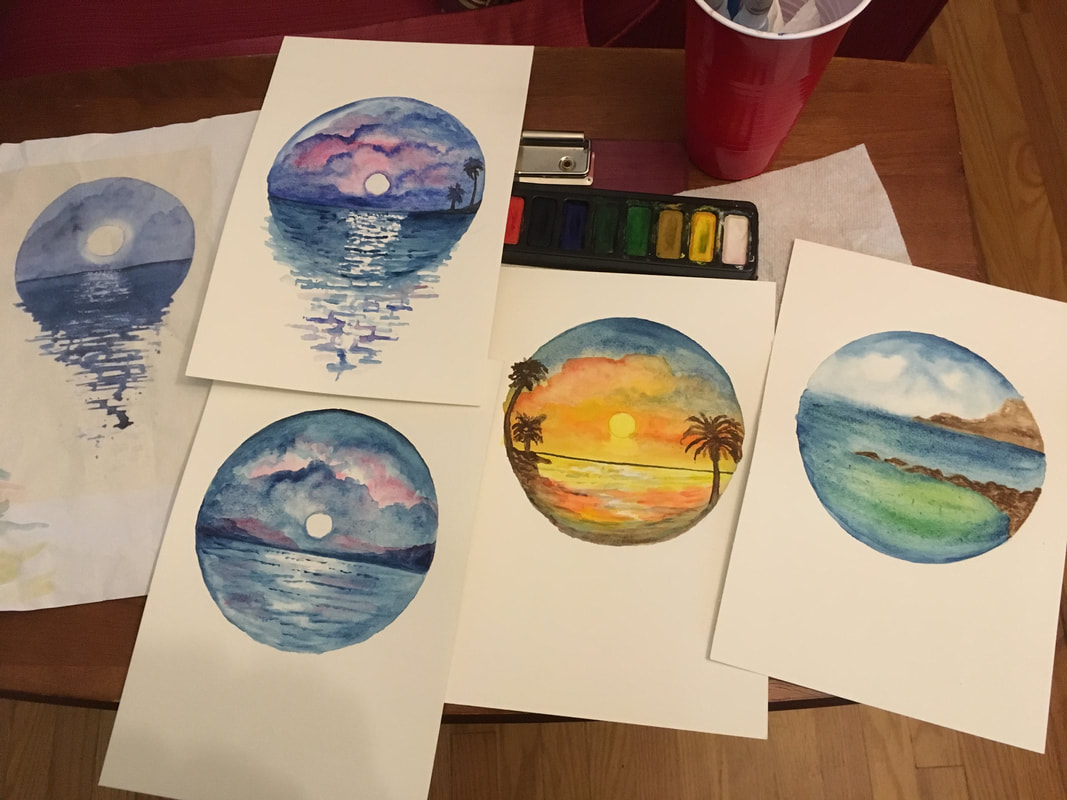 The truth is, “Not much.” I think many artistically inclined people never get started painting because they think, “I don’t have the space, time, or money to paint.” But, that’s just wrong thinking. Instead they should think, “What do I already have that I can use?” Once started, they will find the time they spend learning to paint flies by blissfully. Jane Austen wrote her novels at a desk no bigger than a side table with ink, pen, and paper. I have painted on my lap while perched on some uncomfortable rocks in the fog. Go through your house, see what art supplies you already have, open up a TV tray table and get started.
Recently, I went to the beach with my son for some impromptu fishing and muscle harvesting. I intended to paint the landscape if the tide was high, so I grabbed a few things on my way out the door. Now, I’m an artist with hundreds of dollars worth of supplies ready to go, but my daughter snagged my favorite water color paint set. (I would complain about the theft except that she uses them more than I do and makes beautiful water color paintings). So, I was left to grab paints from a water color paint by number my daughter received years ago, 4 half sheets of left over 9”x12” water color paper, an acrylic clip board, plastic cup, pencil, 2 paper towels, 2 paint brushes and 3 water color pens. I totally forgot a pallet for mixing colors. Oh well. It was slightly overcast at the beach, which is great in California so you don’t go blind as an artist, and the tide was high so I found a rock and set out to start painting. For some strange reason, a bank of fog rolled in from the ocean so thick I could not see where my car was parked about 30 feet away. So, much for practicing landscape today. I rummaged around in my bag and found an image I printed out from Pinterest. I remember being frustrated because the original site was no longer up so I couldn’t find any instructions for how they created the image, but I liked it enough to print it out anyway and use it for inspiration. Well, I grabbed a CD from my car and ta-da I cranked out 4 paintings. Once the fog cleared out I was able to use the local landscape for inspiration to make the Pinterest artist’s idea my own. Can you tell which paintings I created during the fog and which ones I painted once the fog lifted. LOL. That's real life right there. Lesson learned: You don’t need everything to be just right to create beautiful art. You just have to be present to the moment and use the supplies at hand. Don’t make excuses for why you can’t make art like, "The fog rolled in." You’re an artist. Fact: if you're human you're a creator, even if you just create messes. Artists are perpetual problem solvers (rummage in your bag, car, wherever, MacGyver the situation). You've got this! Go paint.
One day in England, I found my kids digging my art out of the trash. I said, “What are you doing? That is terrible.” They said something like, “This art is going to pay for our kids to go to college someday. Remember all those sketchbook pages of half drawn people we’ve seen in the art museums by Picasso, Van Gough, Rembrandt…one day, someone will want this too.” That was the day I learned that the art I create isn’t necessarily for me. I don’t have to think it is good or valuable for it to do good or be valuable. I am shocked by some of the paintings I’ve sold because I can see so many things that, “I could have done better.” But that piece of art was just as it should be for the purchaser, it was meant for them, and I was fortunate enough to participate in the creation of it. If artists do their jobs well, people will see things they’ve overlooked their entire lives. They will learn that clouds are not white and the sky is not blue. Artists reveal that clouds can be white on top, but they have silver, gray, pink, purple, and shades of blue throughout. The sky is most blue when you look directly above your head and it is a lighter blue the closer you look to the horizon, unless you’re observing a sunrise or a sunset when the sky can be gentle purples and pinks, or brilliant yellows and oranges. It is fine to see blue skies and white clouds, but it is better to see the full truth of what you are observing. Artists and Christians, like other humans, do not get things right the first time, or the second, or third. However, artists exhibit what they think is their best art and hide the rest in portfolios under their beds. Christians sometimes act like they have it all together in public, hiding their failures at home. This pretense is not the genuine human experience even though we behave as if it is. God doesn’t expect us to be perfect, or behave perfectly. He asks us to acknowledge His perfection and live a life loving Him and those around us. It’s that easy--and that hard--so is the truth. With this understanding, today, I acknowledge my mistakes and find relief in the fact that I don’t have to hide my imperfections. I have not yet arrived as an artist or Christian, but I will continue to practice both. In the meantime, for your amusement, I provide a painting rescued from the bin by my daughter and one of my first art videos (it made my art group laugh to the point of tears). I don’t think you have to be an artist to know how bad this video is: you know what color you get when you mix red and white, right? Apparently, I forgot in a fit of patriotism. Anyway, a painting and a video to reveal the full truth of my experience as an artist and a Christian. My husband met Philip Yancey at an event last year and received a copy of his book Vanishing Grace. Justin enjoyed his dinner conversation with the author and suggested I might enjoy his book. I finally got around to reading it and this part really grabbed hold of me:
GRACE DISPENSERS While discussing the growing antipathy toward Christians, a friend remarked to me, "There are three kinds of Christians that outsiders to the faith still respect: pilgrims, activists, and artists. The uncommitted will listen to them far sooner than to an evangelist or apologist." Although nonbelievers do not oppose a spiritual search, they will listen only to those Christians who present themselves as fellow-pilgrims on the way rather than as part of a superior class who has already arrived. Activists express their faith in the most persuasive way of all, by their deeds. And art succeeds when it speaks most authentically to the human condition; when believers do so with skill, again the world takes note. As a Christian artist I have a responsibility to dispense Grace. To do this effectively, I must become the best artist I can be so that my skills do not interfere with the message. I must spend hours practicing and refining my art in order to present the most clear and understandable images possible. I am often quoted as saying, "Just because you're a Christian doesn't mean you can suck at your job". As Christians, we must be better at our jobs than the average person because we are representing the King. Christian art should never be synonymous with second rate, just okay, cliche, or predictable art. If we do our job properly, Christian art should mean inspired, beautiful, truthful, insightful, excellent. I may not be there yet, but I have a life time to perfect my artistic skills and leave something that outsiders of the faith will hopefully respect, admire, and stir them to investigate the source of my beliefs and their own. In the end, I hope to be remembered as a dispenser of grace-filled art for a hurting world. What are you dispensing? 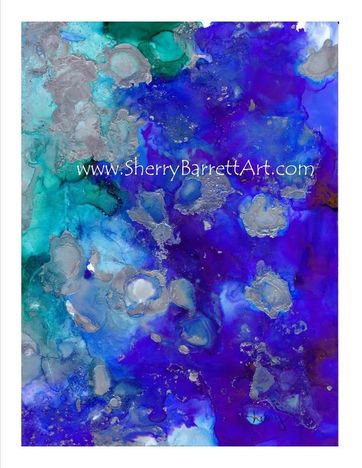 Everything in our lives does not need to be a masterpiece. Everything in our lives does not need to be perfect, have purpose, or change the world. Sometimes we just need to play. Sometimes we just need to be present and enjoy being alive and available to the magic of the moment.
From my last post you know I’ve gone through some relational difficulties. It has been emotionally exhausting and caused a background illness to rear its ugly head. This kind of thing can kill art. Or, I should say, I let it kill my art. I was too much in my head. Everything I was working on was too precious, it had to be perfect, it wasn’t communicating what I wanted, and I was frustrated. So, I stopped drawing and painting. Quitting is easy, but dangerous. Like exercise, it takes a long time to get into shape and only days to fall out of shape. This is why we have to be part of a community. A friend from one of my art groups has been flooding my inbox with YouTube videos for various acrylic painting techniques. Some of the images piqued my curiosity and after watching every YouTube video she sent I could not wait to paint again. But, this playful painting style did not come naturally to me. My first two images were very controlled, and beautiful, but not quite play. I’ve been reading The Good and Beautiful LIFE by James Bryan Smith and he says, “Play cannot be controlled, no matter how hard we try. Sports teams try to keep the game under control, but that is impossible. Every ‘play’ that happens during a game unfolds in unexpected ways. This is what makes play so entertaining. Spontaneity is one of the spiritual benefits of play. We learn to let go. We relax, let ourselves become vulnerable and open up to whatever happens.” The next dozen images were truly play. I hadn’t created abstract/expressionist paintings since high school and I forgot how much fun I can have painting. The hours flew by and I covered every canvas in sight and used up 8 bottles of 10 year old paints that weren’t good for much else. If you’re stuck in your art (or your life), stop and play. You can’t afford not to. It’s not a distraction, it’s not a waste of time, it’s not a waste of art supplies. It’s good for the soul and that’s good for everything. Ask yourself, what would it look like for me to play today? I give you permission to play and invite others to join you…I bet they need it too.
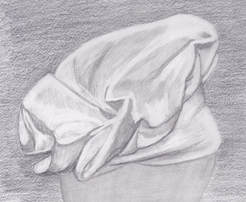
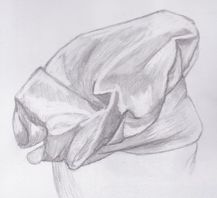
Drawing an all-white object is a great way to learn that all-white objects are not all white. With careful observation, the artist is forced to take note of the dark, medium, light and bright whites that give white objects their shape. The artist also notices that white objects do not exist in an all white room. Sometimes the space around a white object is equally important in telling the tale of the white object. So, sharpen your pencil and start drawing that white bird bath, chair, trellis, or whatever catches your eye .
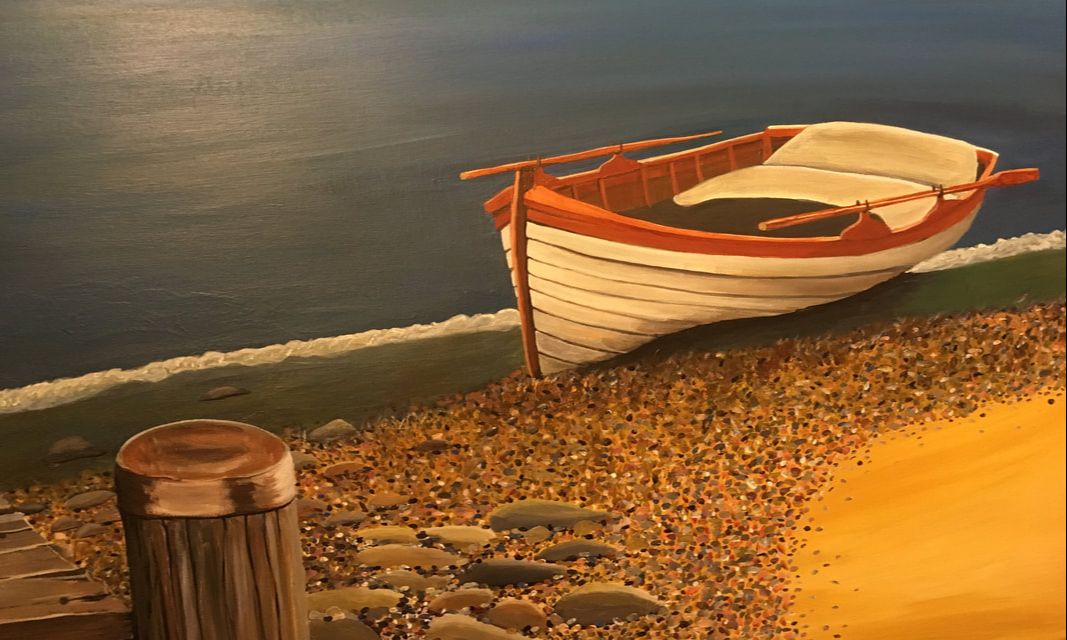
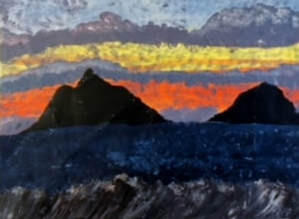
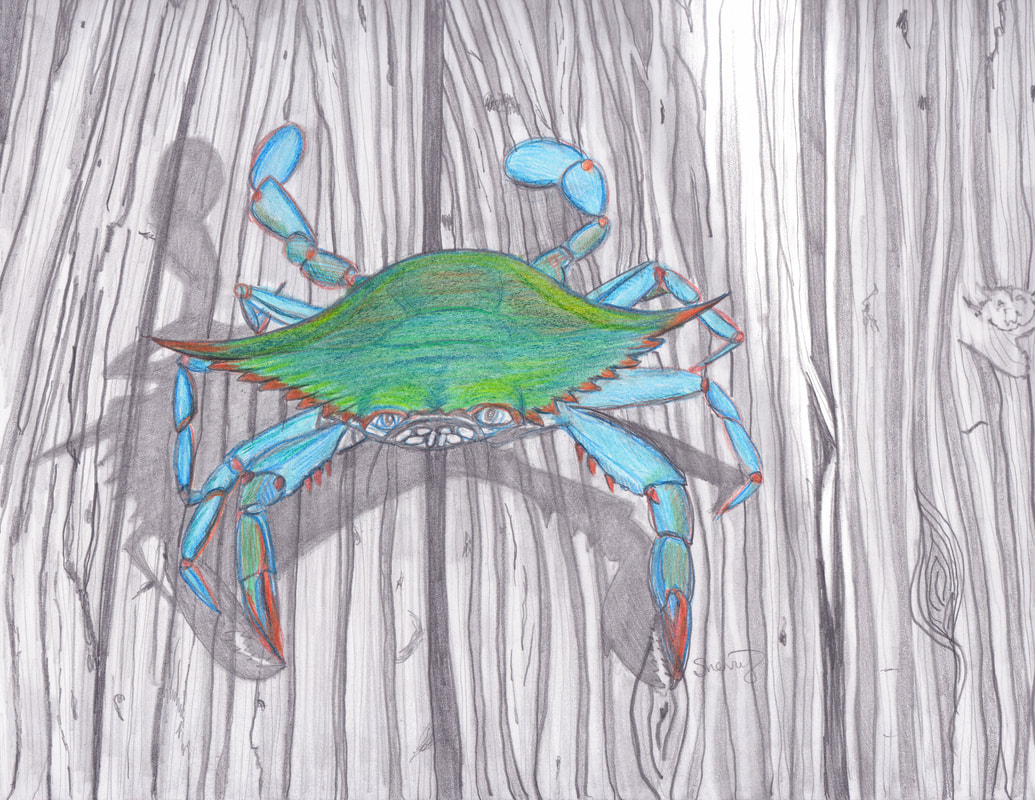 Yesterday was a bad day. The kind you hope never comes, but will come because we are humans in relationship with each other. I was trying to go about business as usual, to keep my sanity and not overthink things, when I came across the most amazing photo on my home banking website. It was the image you see above. This image brought to mind the smell of fishy water, the sound of clinking sailboats, and many wonderful childhood memories. The long shadow cast by the crab reminded me of waking very early during summer vacation with my brother and sister to walk down to the beach to go crabbing. I can feel this splintery dock under my feet as I walk along to find the perfect spot. I remember the indents in my knees from the rough wood as I knelt down to tie my line to a plank. The thrill of slowly pulling up the string, straining for a glimpse of a crab on the bait through the murky waters of the Chesapeake, while sibling one or two stands by with the net, ready to scoop the crab before it can get away. Once we get the crab on deck, we examine the brilliant colors, the size of the claws, is it a fighter or is it chill, is it a keeper?! I think this one is too small to keep and will be allowed to scuttle sideways back into the Severn River. Most days we would return home from crabbing empty handed but happy for having "caught" half a dozen, too small crabs. Mom would make us a tuna sandwich for lunch and Dad would remove the splinters we acquired from the pier as we recounted the glories of our morning adventure.
I knew I needed to draw this photograph from my bank's web page, because there was healing to be had in this image for me. There was a place for me to visit in my mind to serve as a break from a broken relationship I needed to address later that evening, the sudden death of a friend, and the waves of tears that kept overtaking me unexpectedly throughout the day. Tough as I may think I am, emotions sweep over me like waves of the ocean sometimes. They drag me down, rake me across the bottom and spit me out again with a mouth full of sand. I've learned from the ocean to grab a breath of air before the next wave hits, because it will be coming shortly after. Art is one way I catch my breath. Art, for me, is a place of rest. A time to slow down and look and really see. I allow myself to be absorbed into the scene and feel something else for a while. It saddens me that the arts are vanishing from our education system. How will people find rest for their minds? The STEM subjects may cure illnesses of the body eventually, but the arts are soothing to the everyday bumps and bruises of the mind today. The arts provide the brain an alternate route, another way to find solutions to the problems we encounter, a time outside of time, a place outside of here and now. Today, art taught me that the loss of my friend is like coming home empty handed. I am sad for myself because her company was delicious, but happy for her because she is safe and happy where she belongs. I learned that friendship is worth the splinters left in my life that will be painful every time I step on them and take time to heal but serve as lovely reminders of the memories built together. Today, art helped me catch a breath between the waves of repairing a broken friendship and mourning the loss of a dear one to death. I dedicate this drawing to the memory of my dear Elena who is now with her Jesus. Your life mattered my friend and you will be greatly missed. Thanks for all the splinters.  Have you ever wondered what artists are doing when they seem to be glaring at a pencil they are holding at arms length? It may look ridiculous, but this is how artists take measurements. We don't carry a measuring tape like a seamstress, but we've learned to measure with one eye, a straight arm and a pencil, paintbrush, or just our hand. Proportion helps to harmonize our drawing with itself.
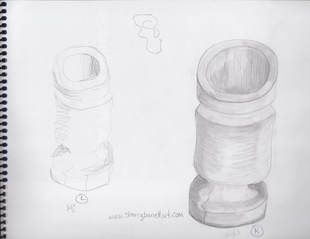
To practice drawing in proportion find an object in your house that you'd like to draw. I chose to try my cup again. 1. Place the object on the table in front of you. 2. Take your pencil in your drawing hand, extend that arm fully until your elbow locks. Close one eye and look at your object behind the pencil. 4. Place the tip of your pencil at the top of the object and slide your thumb nail down the pencil to the bottom of the object. That space from the tip of your pencil to your thumb is your height measurement. For this exercise, transfer this measurement directly onto your paper by placing your pencil on the paper and marking with the top by rocking your pencil so the lead makes a mark, then point a finger where your thumb nail is on the paper and make a pencil mark by that finger. 5. Next, turn your pencil horizontally, fully extend your arm and lock your elbow, close the same eye and look at the object along the pencil. Place the tip of the pencil on the far left side of the object and slide your thumb along the pencil until your nail reaches the far right side of the object. Transfer these width measurements to your paper in the same way. 6. You can also take more measurements. Perhaps you are drawing a wine glass and you need to determine where the glass ends and the stem begins. To do this, measure from the top of the glass to the start of the stem. Mark that distance on your drawing. Now, keeping your thumb in place (or remeasure the top again if you lost it) slide the tip of your pencil down to the start of the stem, where does your thumb land in relation to the object? Is it the bottom of the stem or the base of the glass or far below the glass on the table? Use that measurement to get the bottom half of the glass in proper proportion to the top. If you are measuring a brandy glass, the stem may begin 1/4 from the bottom of the total measurement; whereas, a wine glass stem may begin in the middle of the total measurement. 7. Proceed to draw your object within those boundaries and you will be delighted with the results. Measuring always ensures that people won't mistake your brandy glass for a wine glass. Tips and Tricks: 1. Always close the same eye. (Go ahead, close your left eye, then your right eye while looking at your pencil and see what happens.) 2. Always fully extend your arm and lock your elbow, otherwise you will get a different measurement every time you put your pencil in front of you. 3. Try not to wiggle around or tilt your head. Stay put while measuring. 4. If your eyes refuse to cooperate with pencil measuring, take a photo of your object and print it out on your printer in black and white. Get out a ruler and literally measure the object in the printout. Place those measurements directly on your blank paper to serve as guidelines. Now make yourself draw within those boundaries and your object will be in proper proportion. If a drawing is bothering you, it's often because something is out of proportion. I was recently helping a friend with a sea turtle that didn't look quite right. We laid her pencil on the turtle's shell and then on the front flipper to check the proportions. We couldn't believe the sea turtle's front flipper was as long as its shell. She had to make that front flipper longer than seemed necessary. But as soon as she lengthened the flipper, the drawing came together. Correcting a mistake is so much easier than starting all over again, so don't be afraid to measure before, during and after. Erase and replace faulty lines to get that proper proportion. And take heart, the more you practice the better your brain will get at seeing proportion without even measuring.
 Tips and tricks:
You can do the sketches in pencil, crayon, marker, pen, watercolors, patchwork quilt, cut up and glued magazine pages.... whatever is fun for you, do it that way. Make a salt dough sculpture of your cup if you prefer. Take photographs of that cup, manipulate the image, super close up, super tiny. Just make it your own cup. If you're not happy with your results: 1. Do a google image search "cup sketches" or "goblet sketches" and look at them. Study them, what did they do that you would like to imitate? 2. Choose the most complicated looking cup you have, it may be easier to draw than a simple one. We are less likely to draw a symbol (something you would draw for a picture guessing game) when there is more detail to the cup. Our eye sees that more information is required to identify THIS particular cup. 3. Turn your cup upside down and draw it that way, it may be easier. 4. Stop erasing. Just keep drawing. Leave the wrong lines, make the good lines darker. (Think of those animation sketches with all of those random lines) 5. If it's not going well and your frustration level is high, stop. Do something else and try again later. Sometimes when a drawing isn't coming out quite right it's because I have overlooked some principal of perspective. I don't like to plan my artworks when I'm playing. I prefer to jump in and see what happens. Along the way I may realize my drawing is looking funky (not in a good way) and when I step back and think I realize this scene requires multiple vanishing points. If I like the drawing enough, I'll start again with a plan.
Don't give up on those good ideas that aren't turning out properly. Just set them aside; because, one day, when you're working on something unrelated, your mind will make a link between something you just learned and that old painting that wasn't working and you can now bring that old drawing to real life with the new insights you've acquired through patient practice of your art. |
AuthorSherry Barrett is an active artist who takes inspiration from great works of literature, historical figures, and wise people. Archives
February 2021
Categories
All
|
 RSS Feed