Sherry Barrett - Linedancers.org
  • Home
  • Sign up for class!
  • Line Dancing
    • Senior Living Resort Dancing
    • Line Dance Level 3
    • Line Dance Resources
    • Step Sheets
    • Instructional Videos
    • Dance Blog
    • Choreography
    • PHOTO GALLERY
  • ABOUT
  • Art Gallery
    • The Artist Sherry Barrett >
      • Art Instructional Videos
      • FREE Art Resources
      • TOU
      • Blog
    • #MeToo - Hope In Release
    • Drawings Slide Show
    • Watercolor Slide Show
    • #SpillGrace
    • Images for Instrospection
    • St. Nicholas Project
    • Abstract Art
  • Contact

Art Instruction and Musings

Varnishing Acrylic Paintings

7/17/2018

0 Comments

 
Picture
Picture
It’s important to protect acrylic paintings you like by varnishing or framing them behind glass. Acrylic paintings can get dirty like any other plastic object in your house, imagine an exploding soda or great-aunt Edna smoking. A proper varnishing is the most cost effective solution for large canvas paintings. I recently varnished a 4’ x 6’ acrylic painting and thought I’d share what I learned. Let it be known, there is the right way to do things and then there is your way to do things. You have to do what works for you, your space, and your budget. Disclaimer: Always follow manufacturer’s directions, even if I don’t.
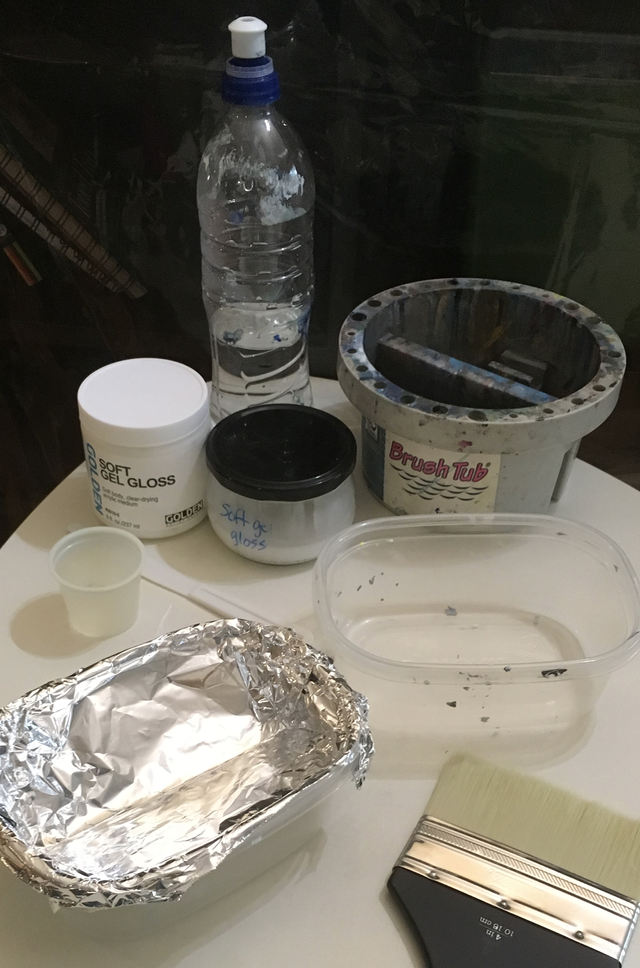
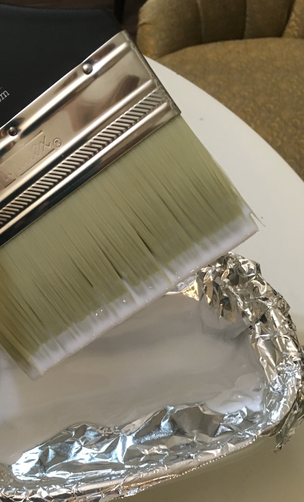
Equipment:
  1. Clean container to mix gloss and varnishes. I use small, shallow glass salsa jars with lids. I mix things up the day before and let them sit to allow air bubbles to clear.
  2. Measuring cup. I use a medicine cup that came with liquid benadryl because a little varnish goes a long way. I tend to mix 2 Tbsp gloss medium to 1 Tbsp water at a time.
  3. Brushes: I like using a 3” foam brush ($3) or 3” flat Redline brush by Princeton ($35). Golden doesn’t like you to use foam with their products but I like how it handles. You can use cheaper paint brushes, but the Princeton brush was the only one that didn’t make me want to curse.
  4. Stir stick. I use a pallet knife or popsicle stick.
  5. I make a special aluminum foil thing to pour my gloss medium and varnish in while painting (see photo). I saw this trick on YouTube and LOVE it. Less product is wasted and you get just the right amount of varnish on your brush each time. Cut a piece of foil to fit  a shallow container. I use a container lunch meat came in because my 3” brush fits it nicely. Fold your foil in half length wise and crease the bottom. I then fold the sides over to fit in my container so I have a rectangle of foil. Open up the foil rectangle, place the crease towards the bottom of the container and then wrap edges of foil around edges of container maintaining your crease in the bottom so you have a V shape inside. Pour in a little medium and add more as needed. When I am finished that session of varnishing I throw away the foil and make a new one each time. Sorry planet earth!
Varnishing Process:
  1. Allow the painting to cure before varnishing. Depending on environmental factors an acrylic painting will cure in 36 hours to a week.
  2. Lay the painting flat. I have varnished paintings on the easel in the past, but apparently, that’s not best practice.
  3. Ensure the artwork is dust and lint free. I use an eyeglass lint free cloth to wipe my painting. I also put vent filters over the air supply vents in my art room to help catch dust and lint.
  4. Apply an isolation coat before varnishing if you want the painting to last forever. If you want the painting to survive only 100 years, skip this step. I use Golden gloss medium according to their website directions for an isolation coat. I apply 2-4 thin coats left to right and up to down. I have floor lamps pointing at all angles so I can ensure I have a nice thin even coat and remove any blobs or lint I find immediately. I allow a day between applying coats because I like the lighting best in the morning, but you don't have to wait a day before varnishing. 6 hours is plenty of time between coats. https://www.goldenpaints.com/technicalinfo_polvar
  5. Apply varnish. If you want the painting to last forever use a varnish with UV protection. If you just want to protect the painting for your lifetime use any varnish that will not yellow with time. Varnishes come in Matte, Satin and Gloss finishes and which you use is a matter of personal preference. If you’re unsure, paint stripes of colors you’ve used in your painting on canvas paper so you can fit many color combinations the length of the paper. Then paint a stripe of Matte, Satin and Gloss over the stripes to see which displays your colors to best advantage. Also, some people don’t like gloss because it is a reflective surface in some lighting conditions. I apply 2-4 thin coats of Golden Gloss Polymer Varnish w/UVLS because I like the shiny finish and vibrancy of the colors beneath. Follow the mixing and application directions on their website. https://www.goldenpaints.com/technicalinfo_polvar
  6. Protect from dust as it dries allowing 1-2 weeks before shipping or storing. ​
0 Comments

    Author

    Sherry Barrett is an active artist who takes inspiration from great works of literature, historical figures, and wise people.

    Archives

    February 2021
    September 2019
    July 2019
    May 2019
    April 2019
    March 2019
    January 2019
    December 2018
    October 2018
    September 2018
    July 2018
    May 2018
    February 2018
    January 2018
    November 2017
    September 2017
    August 2017
    July 2017
    June 2017
    May 2017

    Categories

    All
    Achieving Likeness
    Art Museums
    Art Therapy
    Bad Art
    Devotional Art
    Digital Art
    Drawing
    For New Artists
    Getting Unstuck
    Life Of An Artist
    Oil Painting
    Pandemic Artist
    Perspective
    Realism
    Staging Art
    Varnishing

    RSS Feed

    Sherry Barrett
  • Home
  • Sign up for class!
  • Line Dancing
    • Senior Living Resort Dancing
    • Line Dance Level 3
    • Line Dance Resources
    • Step Sheets
    • Instructional Videos
    • Dance Blog
    • Choreography
    • PHOTO GALLERY
  • ABOUT
  • Art Gallery
    • The Artist Sherry Barrett >
      • Art Instructional Videos
      • FREE Art Resources
      • TOU
      • Blog
    • #MeToo - Hope In Release
    • Drawings Slide Show
    • Watercolor Slide Show
    • #SpillGrace
    • Images for Instrospection
    • St. Nicholas Project
    • Abstract Art
  • Contact