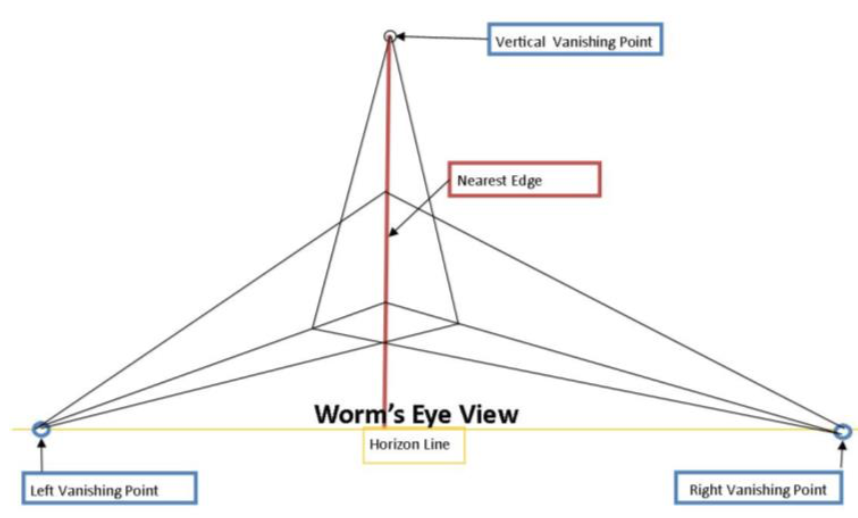
  Three point, or oblique perspective, is helpful when drawing a very tall building from ground level; or, when looking down from a very high vantage point. Three-point perspective often reveals 3 sides of an object with the help of 3 vanishing points. Two of the vanishing points are located on the horizon line and the third point is located either above the horizon line for a worm's eye view or below the horizon for a bird's eye view. The horizon line is always placed at the the viewer's eye level. Place the horizon line near the top of the paper to present your bird's eye view or the bottom of the paper to get the worm's eye level. Keep in mind, there are no horizontal or vertical lines in 3-point perspective as every line recedes to a vanishing point. 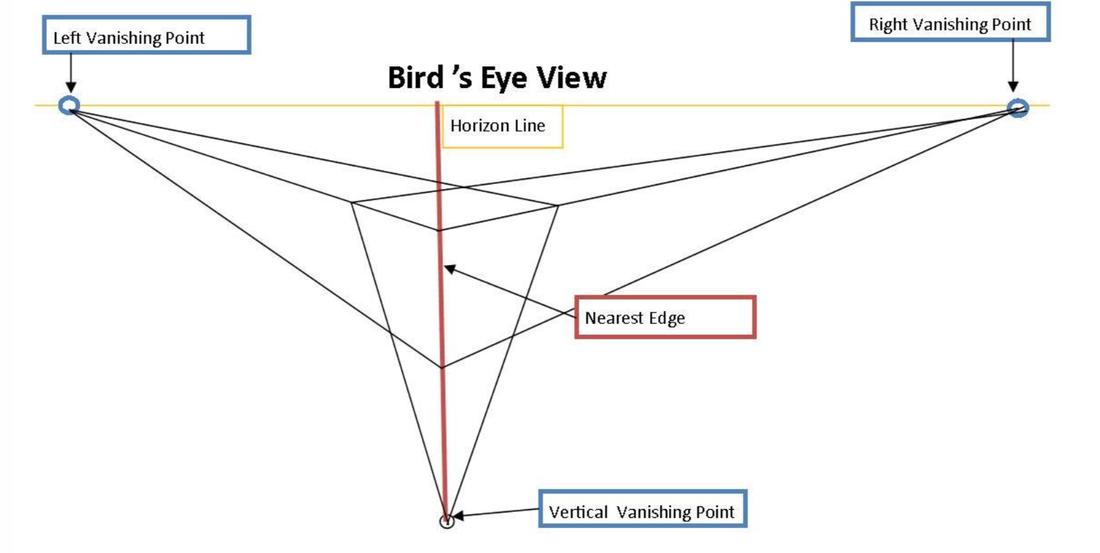  Practice 3-Point Perspective:
1. Draw the horizon line at your eye level and vertical line closest to you. 2. Draw the angle from the top of that line to the vanishing point to the left on the horizon line. Next, draw from the bottom of that line to the same vanishing point. 3. Determine the slant from the right of the vertical line and draw a line from the top of the vertical to the horizon to determine the right vanishing point on. Now, draw the lower line on the right. 4. To determine the vertical vanishing point, decide the width of each side of the cube and the angle of those lines. At the intersection you will find the third vanishing point. It will be perpendicular to the horizon.
0 Comments
 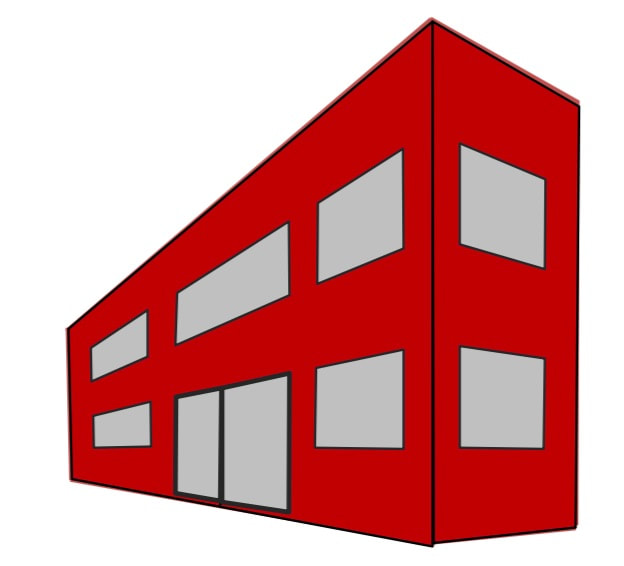 Two point perspective is also known as angular perspective and can be observed by standing in front of the corner of a building. From this "street" view we can see the left and right sides of the building but we can’t see the top or the bottom. We observe two sets of parallel lines receding to two separate vanishing points on the horizon.
Practice Two Point Perspective:
One point perspective can be very dramatic when used to effect as I did in my painting #Me Too-Hope In Release. Today, I explain the basics of one point perspective as you might use them in drawing a fish tank, a box of crackers or a road vanishing in the distance. Get out a ruler and have fun creating fantastical images using one point perspective. 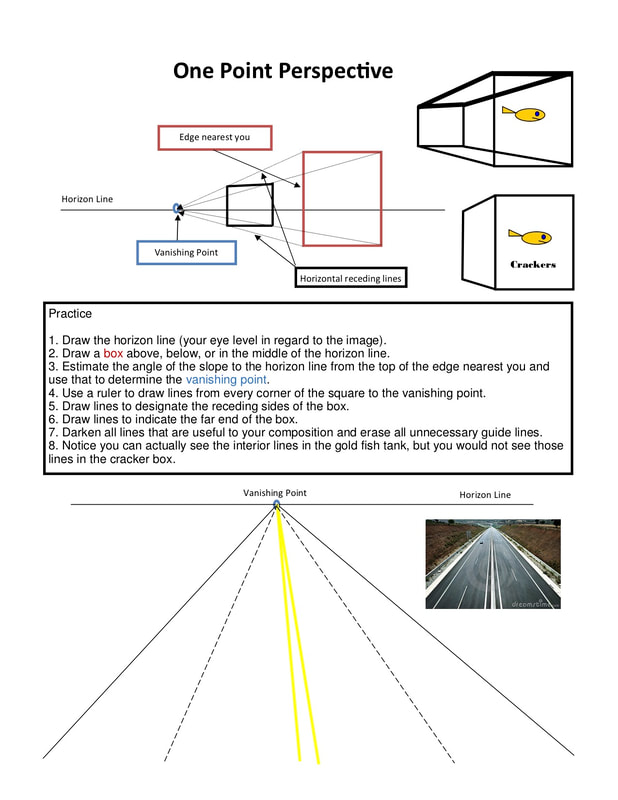  Have you ever wondered what artists are doing when they seem to be glaring at a pencil they are holding at arms length? It may look ridiculous, but this is how artists take measurements. We don't carry a measuring tape like a seamstress, but we've learned to measure with one eye, a straight arm and a pencil, paintbrush, or just our hand. Proportion helps to harmonize our drawing with itself.
To practice drawing in proportion find an object in your house that you'd like to draw. I chose to try my cup again. 1. Place the object on the table in front of you. 2. Take your pencil in your drawing hand, extend that arm fully until your elbow locks. Close one eye and look at your object behind the pencil. 4. Place the tip of your pencil at the top of the object and slide your thumb nail down the pencil to the bottom of the object. That space from the tip of your pencil to your thumb is your height measurement. For this exercise, transfer this measurement directly onto your paper by placing your pencil on the paper and marking with the top by rocking your pencil so the lead makes a mark, then point a finger where your thumb nail is on the paper and make a pencil mark by that finger. 5. Next, turn your pencil horizontally, fully extend your arm and lock your elbow, close the same eye and look at the object along the pencil. Place the tip of the pencil on the far left side of the object and slide your thumb along the pencil until your nail reaches the far right side of the object. Transfer these width measurements to your paper in the same way. 6. You can also take more measurements. Perhaps you are drawing a wine glass and you need to determine where the glass ends and the stem begins. To do this, measure from the top of the glass to the start of the stem. Mark that distance on your drawing. Now, keeping your thumb in place (or remeasure the top again if you lost it) slide the tip of your pencil down to the start of the stem, where does your thumb land in relation to the object? Is it the bottom of the stem or the base of the glass or far below the glass on the table? Use that measurement to get the bottom half of the glass in proper proportion to the top. If you are measuring a brandy glass, the stem may begin 1/4 from the bottom of the total measurement; whereas, a wine glass stem may begin in the middle of the total measurement. 7. Proceed to draw your object within those boundaries and you will be delighted with the results. Measuring always ensures that people won't mistake your brandy glass for a wine glass. Tips and Tricks: 1. Always close the same eye. (Go ahead, close your left eye, then your right eye while looking at your pencil and see what happens.) 2. Always fully extend your arm and lock your elbow, otherwise you will get a different measurement every time you put your pencil in front of you. 3. Try not to wiggle around or tilt your head. Stay put while measuring. 4. If your eyes refuse to cooperate with pencil measuring, take a photo of your object and print it out on your printer in black and white. Get out a ruler and literally measure the object in the printout. Place those measurements directly on your blank paper to serve as guidelines. Now make yourself draw within those boundaries and your object will be in proper proportion. If a drawing is bothering you, it's often because something is out of proportion. I was recently helping a friend with a sea turtle that didn't look quite right. We laid her pencil on the turtle's shell and then on the front flipper to check the proportions. We couldn't believe the sea turtle's front flipper was as long as its shell. She had to make that front flipper longer than seemed necessary. But as soon as she lengthened the flipper, the drawing came together. Correcting a mistake is so much easier than starting all over again, so don't be afraid to measure before, during and after. Erase and replace faulty lines to get that proper proportion. And take heart, the more you practice the better your brain will get at seeing proportion without even measuring. |
AuthorSherry Barrett is an active artist who takes inspiration from great works of literature, historical figures, and wise people. Archives
February 2021
Categories
All
|
 RSS Feed