|
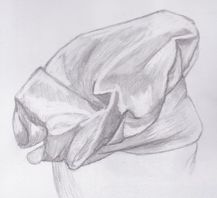
I remember when my high school art teacher, Mrs. O'Neil, put this really complicated drawing in front of me. She placed it upside down and told me to copy it. I immediately, tried to turn it right side up and she said, "No. Don't turn it around. Draw it upside down." I told her, "I can't tell what it is." She said, "You don't need to know what it is. Just draw it. One line at a time." I huffed and puffed, felt frustrated, thought she was crazy, looked around the room, and then my art brain picked up my pencil and got to work. I don't remember deciding to do what she said, but my artself just took over and did it.
You might notice that my last blog was over a year ago. That's when my world turned upside down. In October 2019 I learned I would once again be asked to draw upside down because we would be putting our house on the market in February 2020 to move across the country for my husband to start a new business. Time to purge 9 years of accumulated stuff, paint the house, trim the shrubs and take care of business. Business included driving my son across the country in January to start a new job and find an apartment. Selling my house. Moving my daughter into an apartment closer to her job that she would never return to because in March 2020 everyone joined my personal chaos in the form of a pandemic stay at home order. I, however, couldn't stay at home because I sold it. I needed to buy a house, ship a car, drive a car, ship our stuff. Life goes on pandemic or no, we get to keep drawing even when we don't know how the picture will turn out, one line at a time. So, how am I surviving drawing upside down in the middle of a pandemic? I am trying to keep the main things the main things any way I can. Soul - I pray often. I don't pray well, but I pray. I try to listen, but often hear silence. I play the Daily Audio Bible in the morning when I don’t feel like getting out of bed; so, yeah, daily. I go to a church where everyone wears a mask and social distances properly because I need a life rhythm that involves me leaving the house. Please tend your soul during this time, if you don’t you will whither from the inside out. Mind -It’s been a good time for me to be introspective and think about what I really want and what I can and can't do. I've thought about what I really "need" to be a healthy person. I've accepted the fact that I am an extrovert and no matter how many introverts online yell at me to stay home, my reality is, "Friends are fuel." So, I see any friend who will see me so I don't end up a car out of gas on the side of the road being towed to a mental institution. Please practice mental hygiene and air out your dirty and/or sad thoughts. Don’t hurt anyone with them, just air them. Then, fold them away to make room for cleaner and/or happier thoughts. If you don’t know how, therapy is worth every penny. Body - I’ve joined a gym because my body is seizing up staying inside this winter. I made an appointment with an orthopedist when I discovered I couldn’t do a chest press with 2 pounds. Turns out that chronic shoulder pain was an inflamed rotator cuff and bicep muscle. No surgery needed, just anti-inflammatories and PT. I made an appointment with an eye doctor because I was using two pairs of glasses like a microscope to draw fine detail! LOL! Thank you for the recommendation artist friend Monica Agri-Bowes - it got the job done. Good news, new glasses are on their way. Blue! I'll try to post a pic. Have you let a health issue go too far? If you can get an appointment, get the help you need. You are worthy. Art - I hired an artist mentor because I feared I would completely abandon my art in the midst of the crushing demands of "real life”. My mentor has helped me keep art inside the frame of “real life” and moving in a positive direction. I've continued to illustrate a weekly blog even when I don't feel I have the emotional or physical energy because I want that to be a part of my real life too. I’ve also applied to art school because I’m half way through my life and not halfway to where I want to be as an artist. I have pulled 3 other ladies to me and we do studio time together online once a week. I love looking up from my drawing to see these ladies who live in Georgia, Ontario, Canada, and Massachusetts working away. We encourage and challenge each other to keep making art and provide useful feedback and critique. Do you have support in your work environment? Find support. This past year I haven't been writing on the blog because I haven't been in a position to do so. I've been drawing one line at a time. I decided to pop in here to share what some of my lines have turned into for my soul, mind, body, and art even though I still can’t see the completed picture. In high school, the completed picture turned out to be 3 jackets. My copy was spot on. I’m not sure I could have done it right side up because the amount of detail was overwhelming. My teacher, in her wisdom, turned the image upside down so I could reach the goal by focusing on one line at a time. If you are feeling particularly lonely this year, please hold on. You are not alone, you just can't see the completed picture. You are loved. You matter. Trust me. Happy Valentine’s Day from SherryBarrettArt!
0 Comments
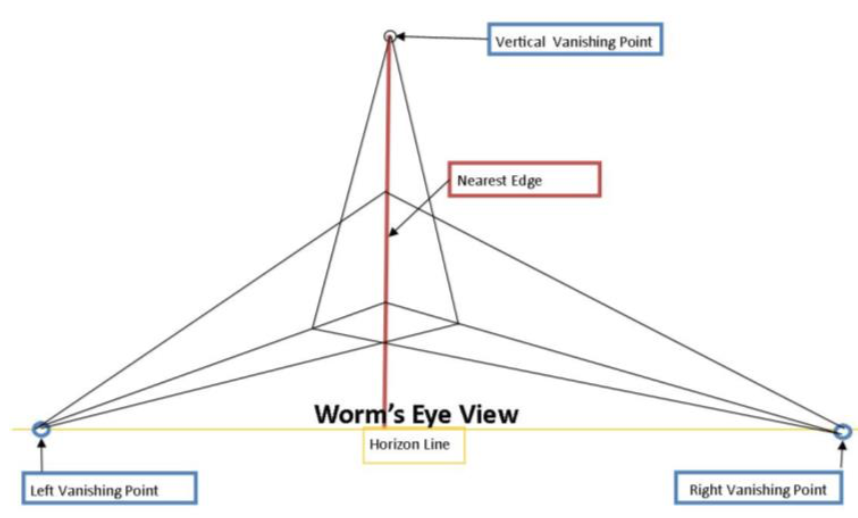
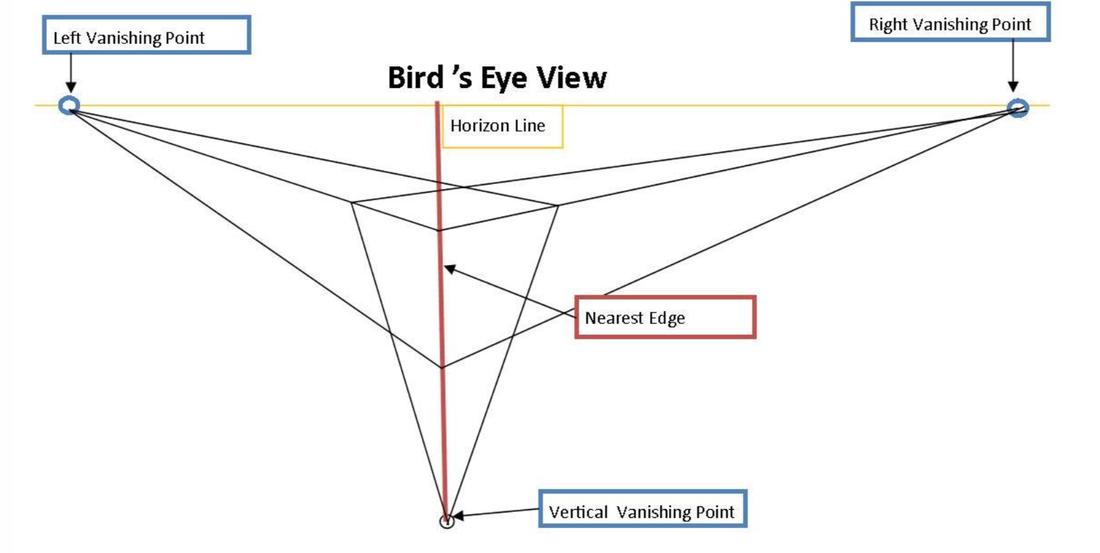
Three point, or oblique perspective, is helpful when drawing a very tall building from ground level; or, when looking down from a very high vantage point. Three-point perspective often reveals 3 sides of an object with the help of 3 vanishing points. Two of the vanishing points are located on the horizon line and the third point is located either above the horizon line for a worm's eye view or below the horizon for a bird's eye view. The horizon line is always placed at the the viewer's eye level. Place the horizon line near the top of the paper to present your bird's eye view or the bottom of the paper to get the worm's eye level. Keep in mind, there are no horizontal or vertical lines in 3-point perspective as every line recedes to a vanishing point. Practice 3-Point Perspective:
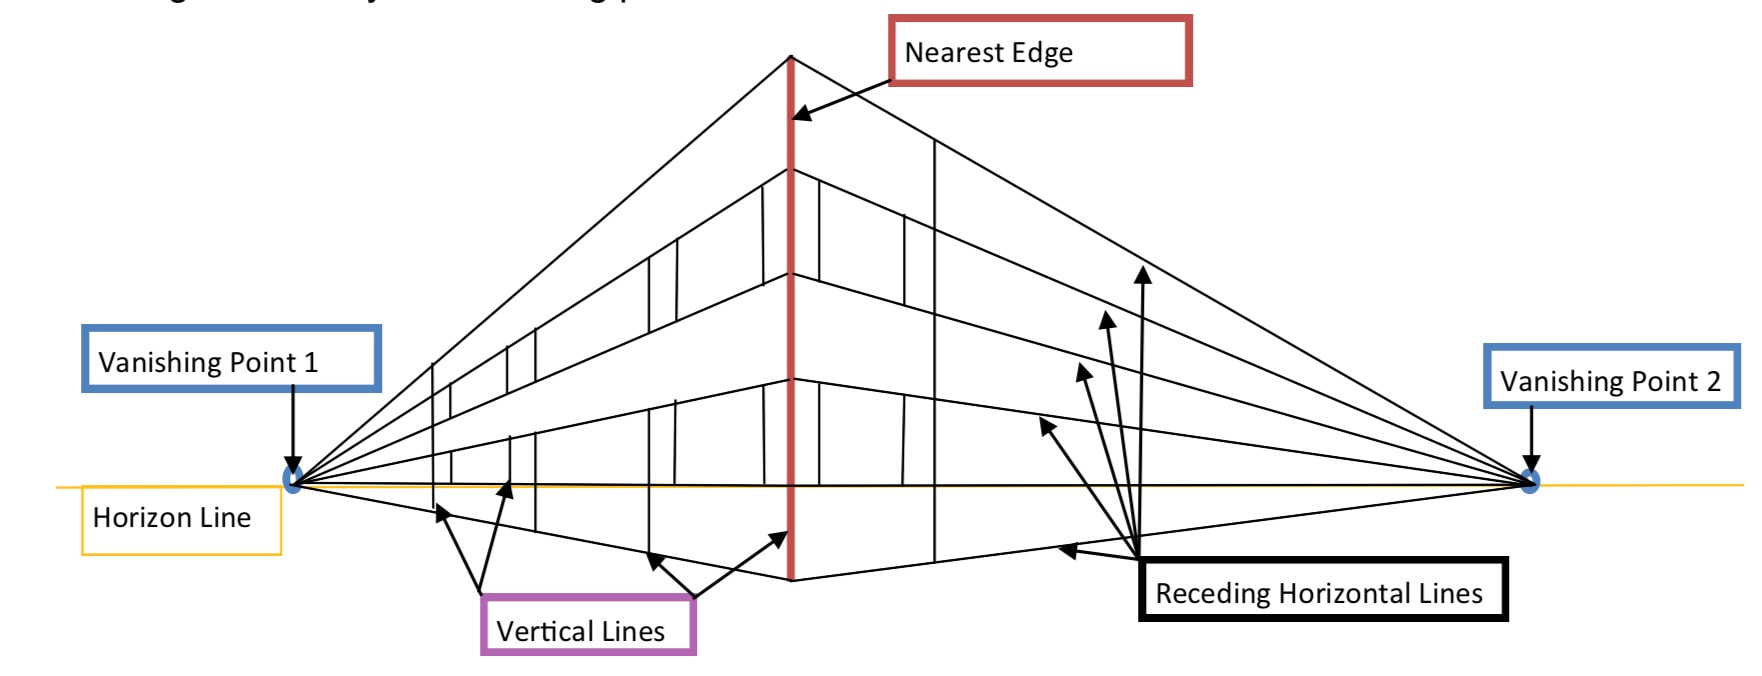
1. Draw the horizon line at your eye level and vertical line closest to you. 2. Draw the angle from the top of that line to the vanishing point to the left on the horizon line. Next, draw from the bottom of that line to the same vanishing point. 3. Determine the slant from the right of the vertical line and draw a line from the top of the vertical to the horizon to determine the right vanishing point on. Now, draw the lower line on the right. 4. To determine the vertical vanishing point, decide the width of each side of the cube and the angle of those lines. At the intersection you will find the third vanishing point. It will be perpendicular to the horizon. 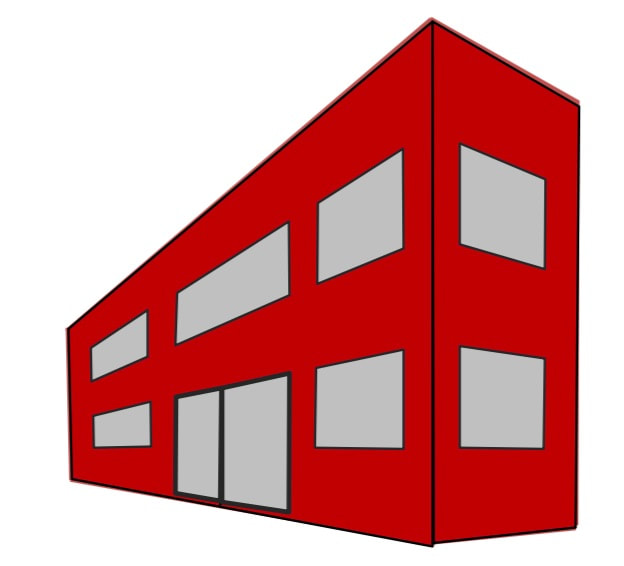 Two point perspective is also known as angular perspective and can be observed by standing in front of the corner of a building. From this "street" view we can see the left and right sides of the building but we can’t see the top or the bottom. We observe two sets of parallel lines receding to two separate vanishing points on the horizon. Practice Two Point Perspective:
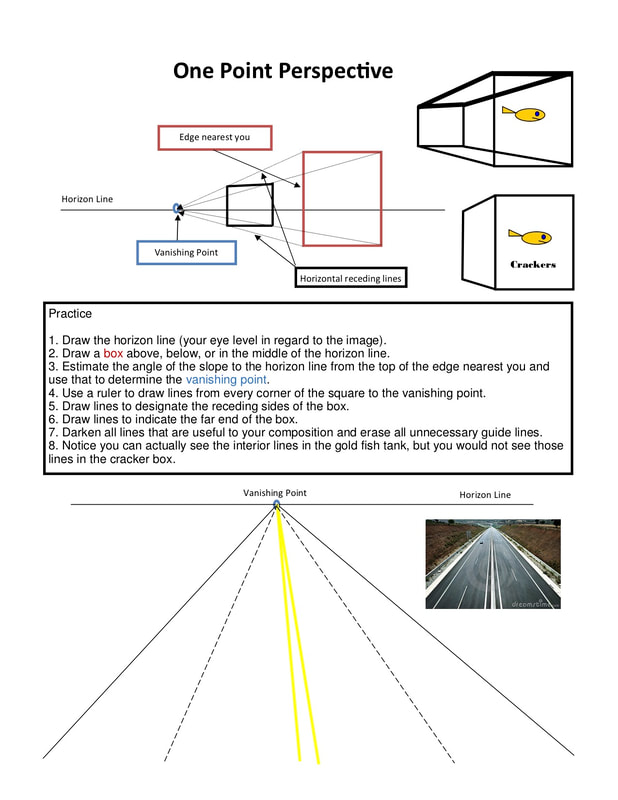
One point perspective can be very dramatic when used to effect as I did in my painting #Me Too-Hope In Release. Today, I explain the basics of one point perspective as you might use them in drawing a fish tank, a box of crackers or a road vanishing in the distance. Get out a ruler and have fun creating fantastical images using one point perspective.
Anyone can draw a person and get everyone to say, “Oh, that’s a person.”
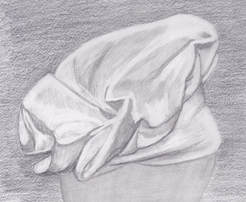
O>-< See, I just did it using a keyboard. You might even say the person is lying down. But, you wouldn’t say it looks like anyone you know. It’s a symbol for person. Our brains are full of symbols for trees, flowers, rainbows and many other things that allow us to draw quickly when playing Pictionary and get the desired answer. But, these symbols are unsatisfying when we are trying to achieve the likeness of a family member. So, how does one get to the point of drawing things as they look to the critical mind? Here are some tips to get you moving in the right direction. #1: Work from photographs you’ve taken. From my experience, realism requires drawing from the real thing. I’ve been drawing off and on my entire life and I cannot whip out a realistic anything from my mind. I can make some cute cartoons or caricatures, and I’m an excellent Pictionary partner, but, if you want realism from me I need to be in front of the thing; or, better yet, a photograph. Photographs are helpful when learning because they can’t blink or move out of place and the lighting won’t change with the movement of the sun. The photograph also does the hard work of translating the 3-D object into a 2-D form. #2: Draw on a large sheet of paper . Trust me, you do not want to draw a full length portrait in a 4”x6” journal. You would need the steadiness of a surgeon to place every mark where it needs to be. I once did a small pencil drawing of my daughter and she looked crazy in the 6” x 9” sketch. I kept looking and looking trying to see what I did wrong. I had to erase the corner of her eye and draw the corner with one pencil dot. With one dab of the pencil it was perfect, but, I had to remove the dash that was wrong so I could place the dot to get it right. A DOT! Larger formats are more forgiving and provide more room for error. #3: Spend more time looking at the subject than your drawing. Don’t dive into drawing right away. Sit there and really look at what you’re drawing for a minimum of 5 minutes. Set a timer. Spend that time tracing every line you see using your imagination. Where are the darkest darks and the lightest lights? Is this composition short and wide or tall and thin? Plan how you will put it on the paper: horizontal or vertical? Will you use a 2B or 6B pencil to draw a baby? What part of the image do you want at the center of your paper? What do you like most about what you’re looking at? Don’t lose that! What is in front and what fades into the background? Really map out the drawing in your mind. #4: Realism requires questions, corrections, erasers, and rulers. For realism to blossom, your perspective lines must be spot on, your horizon needs to be level, the walls of your house need to be straight, and the person’s face must be in proportion to itself. Break out your library card and check out books on perspective, proportions, and drawing realistic faces. Erase errant marks and straighten wavy lines. You must keep looking at the original and compare it with the marks you just put on the paper. Does your line have the same slope? Correct it. Is the house really taller than the tree? Yes, it is a newly planted tree. Reassure yourself because your brain might try to make the tree to tall. #5: Draw something, or someone, to whom you aren’t emotionally connected. We are often unsatisfied with subjects we know very well because we are experts on the subject and emotions can complicate things. Our logical brain says, "Something isn't quite right with this drawing.” Our pet can look like a stuffed animal instead of the warm, charming critter we know them to be. While you are learning to draw more realistically, maybe avoid friends, family and pets for subjects. If you simply must draw a precious subject, consider turning your picture upside down and doing the drawing upside down. It somehow tricks that bossy, doubtful side of your brain so it doesn't quite recognize what you're up to. #6: Practice and patience lead to improvement, not perfection. As you practice drawing you are building your visual vocabulary of how you create various 3-D objects on a 2-D surface. You don't need to be as perfect as a camera because you are not a piece of machinery. But, with enough practice, you just might trick the human eye. Artists are playing an instrument that requires practice and tuning. Just like musicians, artists must practice 8 hours a day to perfect their performance. But even musicians who play a piece perfectly as written, can sound a little different. That’s the magic of humans and snowflakes, no two alike. Artists put a bit of themselves on the paper and that’s okay, even in realism. It takes patience and persistence to achieve a realistic replication of an image and the artist must push through the moment when they most want to quit because that is often the moment they are on the verge of a breakthrough. Remember, what you draw tomorrow will be better than what you drew today because you never stop learning and improving. Drawing an all-white object is a great way to learn that all-white objects are not all white. With careful observation, the artist is forced to take note of the dark, medium, light and bright whites that give white objects their shape. The artist also notices that white objects do not exist in an all white room. Sometimes the space around a white object is equally important in telling the tale of the white object. So, sharpen your pencil and start drawing that white bird bath, chair, trellis, or whatever catches your eye .
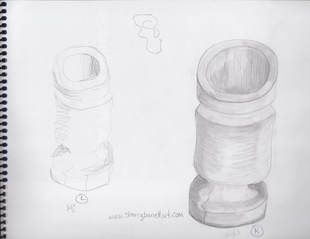
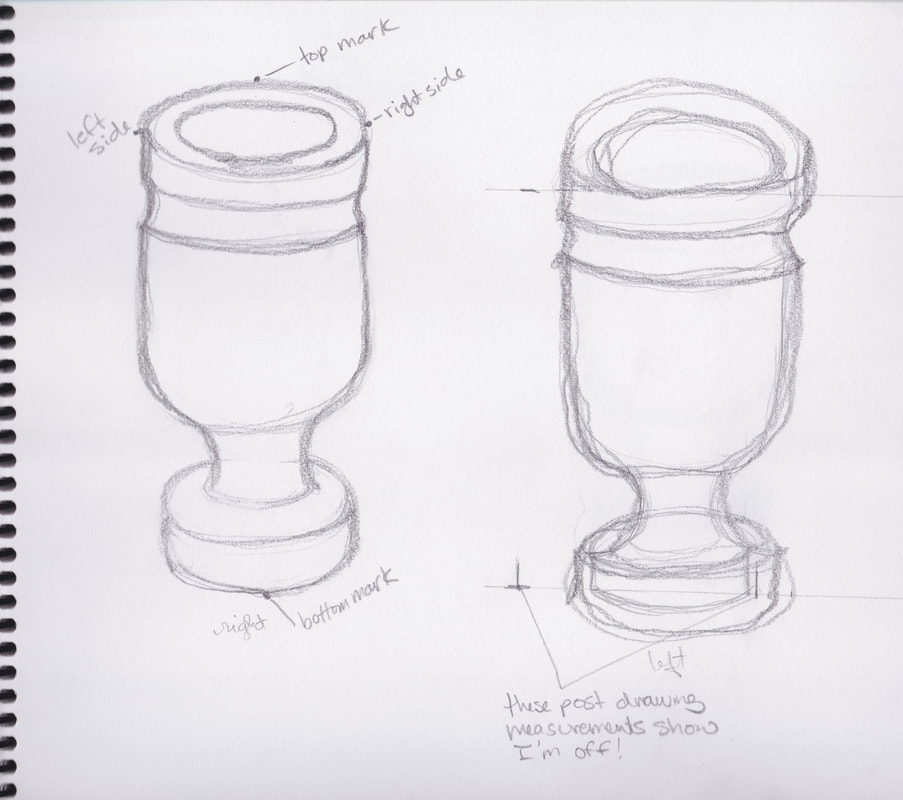 Have you ever wondered what artists are doing when they seem to be glaring at a pencil they are holding at arms length? It may look ridiculous, but this is how artists take measurements. We don't carry a measuring tape like a seamstress, but we've learned to measure with one eye, a straight arm and a pencil, paintbrush, or just our hand. Proportion helps to harmonize our drawing with itself. To practice drawing in proportion find an object in your house that you'd like to draw. I chose to try my cup again. 1. Place the object on the table in front of you. 2. Take your pencil in your drawing hand, extend that arm fully until your elbow locks. Close one eye and look at your object behind the pencil. 4. Place the tip of your pencil at the top of the object and slide your thumb nail down the pencil to the bottom of the object. That space from the tip of your pencil to your thumb is your height measurement. For this exercise, transfer this measurement directly onto your paper by placing your pencil on the paper and marking with the top by rocking your pencil so the lead makes a mark, then point a finger where your thumb nail is on the paper and make a pencil mark by that finger. 5. Next, turn your pencil horizontally, fully extend your arm and lock your elbow, close the same eye and look at the object along the pencil. Place the tip of the pencil on the far left side of the object and slide your thumb along the pencil until your nail reaches the far right side of the object. Transfer these width measurements to your paper in the same way. 6. You can also take more measurements. Perhaps you are drawing a wine glass and you need to determine where the glass ends and the stem begins. To do this, measure from the top of the glass to the start of the stem. Mark that distance on your drawing. Now, keeping your thumb in place (or remeasure the top again if you lost it) slide the tip of your pencil down to the start of the stem, where does your thumb land in relation to the object? Is it the bottom of the stem or the base of the glass or far below the glass on the table? Use that measurement to get the bottom half of the glass in proper proportion to the top. If you are measuring a brandy glass, the stem may begin 1/4 from the bottom of the total measurement; whereas, a wine glass stem may begin in the middle of the total measurement. 7. Proceed to draw your object within those boundaries and you will be delighted with the results. Measuring always ensures that people won't mistake your brandy glass for a wine glass. Tips and Tricks: 1. Always close the same eye. (Go ahead, close your left eye, then your right eye while looking at your pencil and see what happens.) 2. Always fully extend your arm and lock your elbow, otherwise you will get a different measurement every time you put your pencil in front of you. 3. Try not to wiggle around or tilt your head. Stay put while measuring. 4. If your eyes refuse to cooperate with pencil measuring, take a photo of your object and print it out on your printer in black and white. Get out a ruler and literally measure the object in the printout. Place those measurements directly on your blank paper to serve as guidelines. Now make yourself draw within those boundaries and your object will be in proper proportion. If a drawing is bothering you, it's often because something is out of proportion. I was recently helping a friend with a sea turtle that didn't look quite right. We laid her pencil on the turtle's shell and then on the front flipper to check the proportions. We couldn't believe the sea turtle's front flipper was as long as its shell. She had to make that front flipper longer than seemed necessary. But as soon as she lengthened the flipper, the drawing came together. Correcting a mistake is so much easier than starting all over again, so don't be afraid to measure before, during and after. Erase and replace faulty lines to get that proper proportion. And take heart, the more you practice the better your brain will get at seeing proportion without even measuring.
Tips and tricks:
You can do the sketches in pencil, crayon, marker, pen, watercolors, patchwork quilt, cut up and glued magazine pages.... whatever is fun for you, do it that way. Make a salt dough sculpture of your cup if you prefer. Take photographs of that cup, manipulate the image, super close up, super tiny. Just make it your own cup. If you're not happy with your results: 1. Do a google image search "cup sketches" or "goblet sketches" and look at them. Study them, what did they do that you would like to imitate? 2. Choose the most complicated looking cup you have, it may be easier to draw than a simple one. We are less likely to draw a symbol (something you would draw for a picture guessing game) when there is more detail to the cup. Our eye sees that more information is required to identify THIS particular cup. 3. Turn your cup upside down and draw it that way, it may be easier. 4. Stop erasing. Just keep drawing. Leave the wrong lines, make the good lines darker. (Think of those animation sketches with all of those random lines) 5. If it's not going well and your frustration level is high, stop. Do something else and try again later. |
AuthorSherry Barrett is an active artist who takes inspiration from great works of literature, historical figures, and wise people. Archives
February 2021
Categories
All
|


 RSS Feed